이펙트아카데미 특강/외주/커뮤니티
 언리얼4 VFX Basics - Creating the scrolling texture with mask setup
Hey guys, since we seem to get a lot of new VFX artist traffic on here. I thought I would write up a few tutorials on some of the basic stuff us VFX artists use day to day.
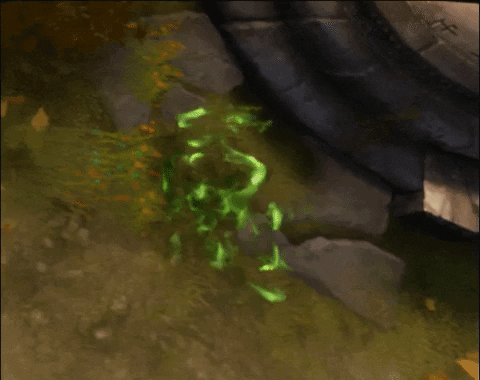
In this first tutorial I will be covering scrolling noise, covered by a mask technique(I am not quite sure what to call it). Also known as “that technique from the Diablo 3 presentation”

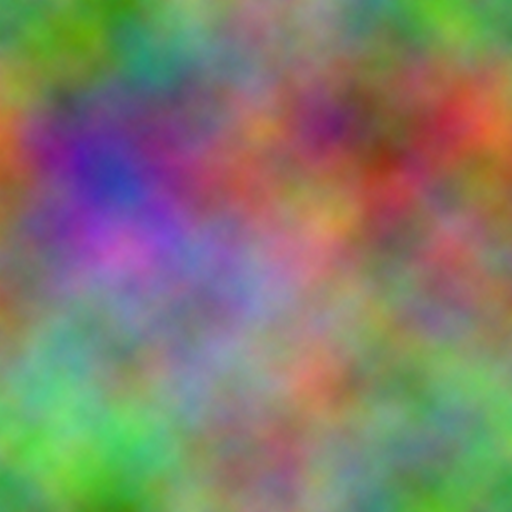
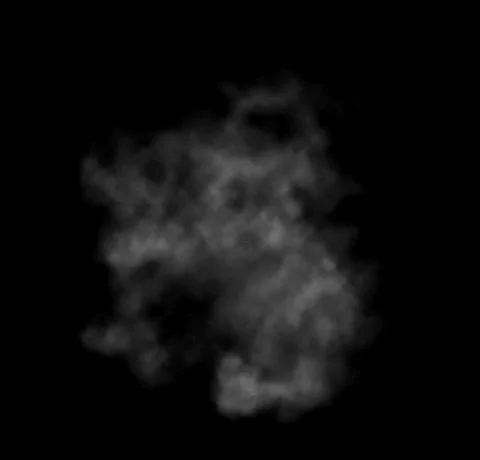
Above I have supplied the two textures we will be using in this tutorial. Feel free to experiment and create your own textures! The image on the left will be used as a mask and the other I will be referring to as the “noise” texture. It’s just an image with different photoshop render clouds in each channel. We will be using this as the scrolling texture that will be multiplied over itself.
Lets start!
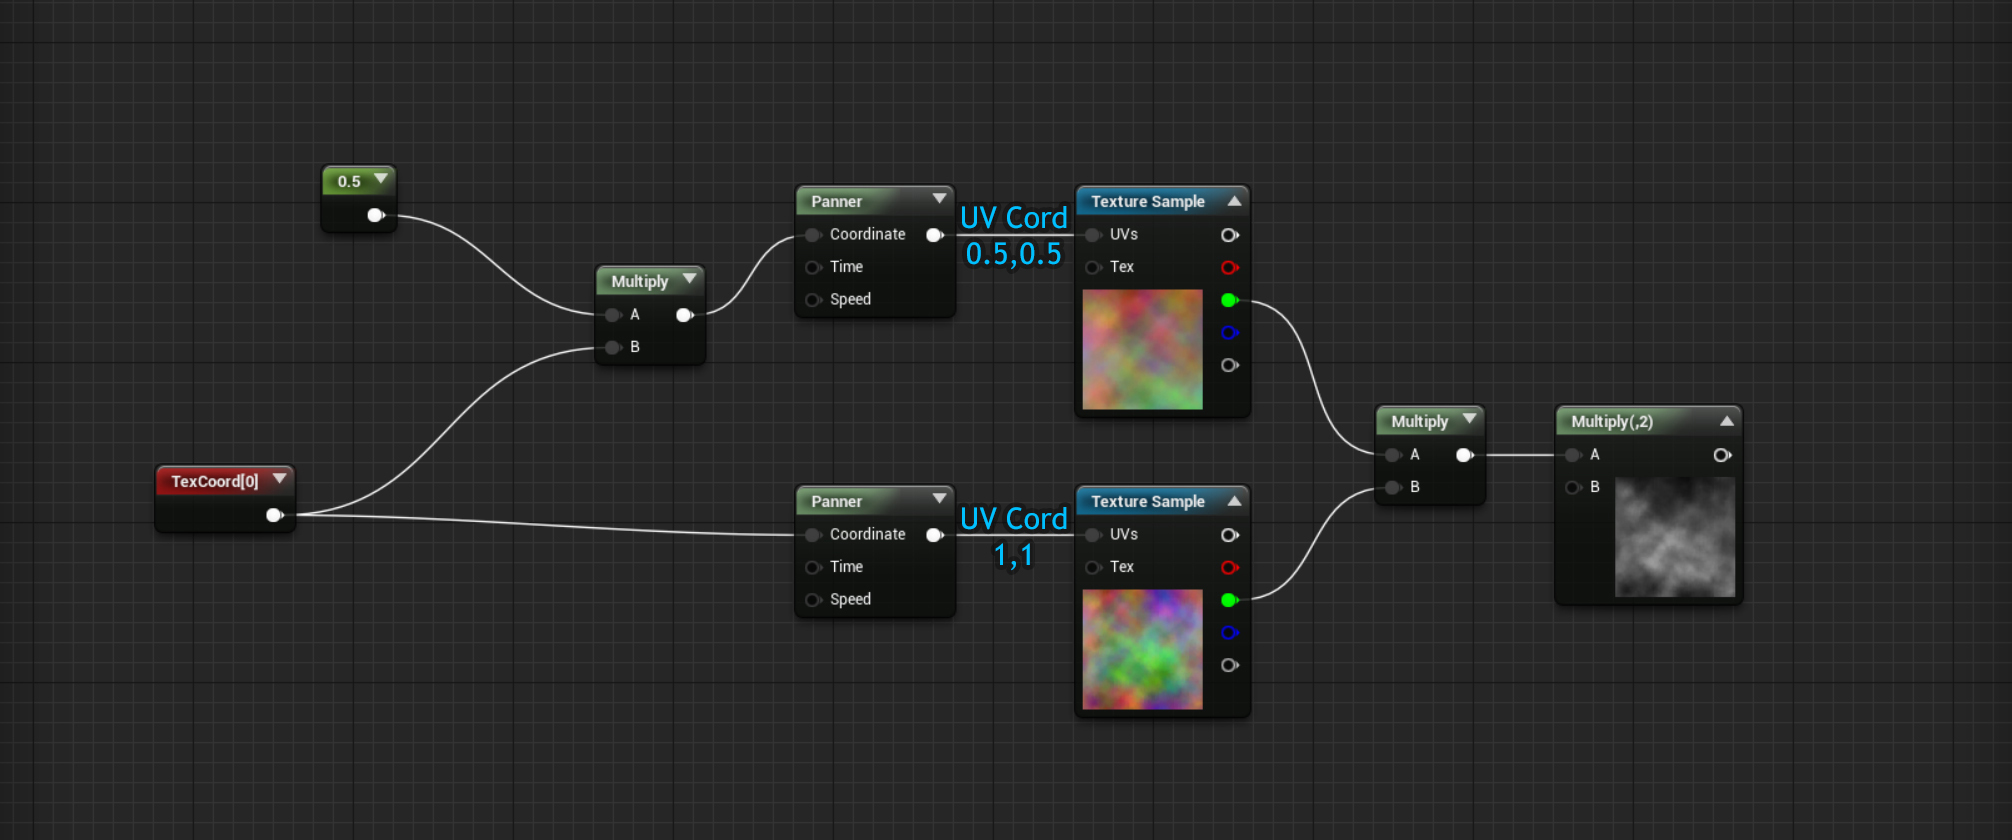
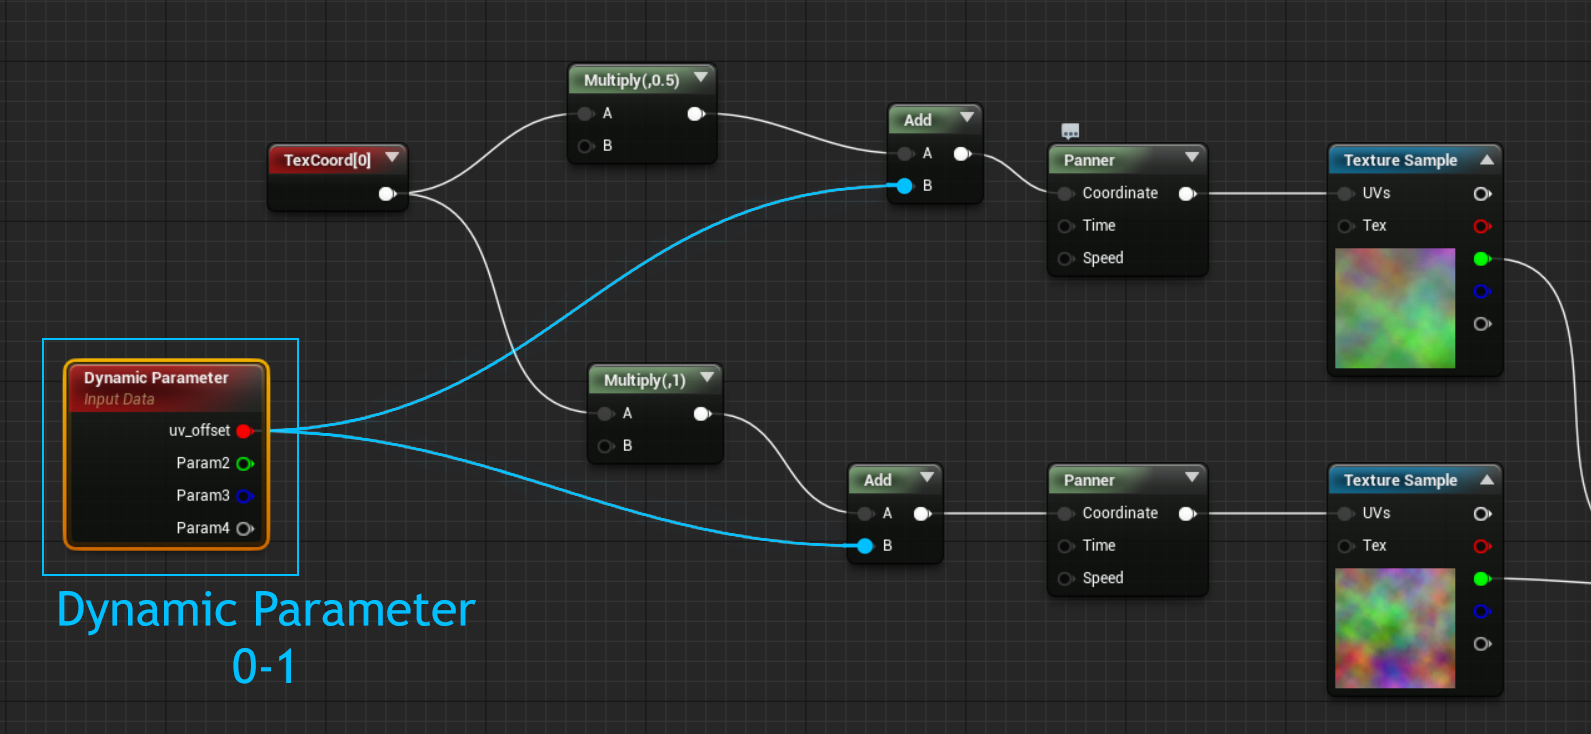
First we need to create two textures samples with two panners. Next we need to create a texture coordinate with the default 1,1 settings and plug it into one of our panners. For the second texture sample, we want to multiply the coordinates by 0.5. Once you have multiplied your coordinates, plug the output into your second panner. Plug the panners into the texture samples. Now plug 1 channel from each of the texture samples into a multiply node. For the above image, I chose to use the green channel. You will notice that when we combine both texture samples with a multiply, the resulting outcome is a little dark. Simply plug the output of the two samples plugged into one another into another multiply node. Then multiply that nodes by two. The outcome should now be much more visible!
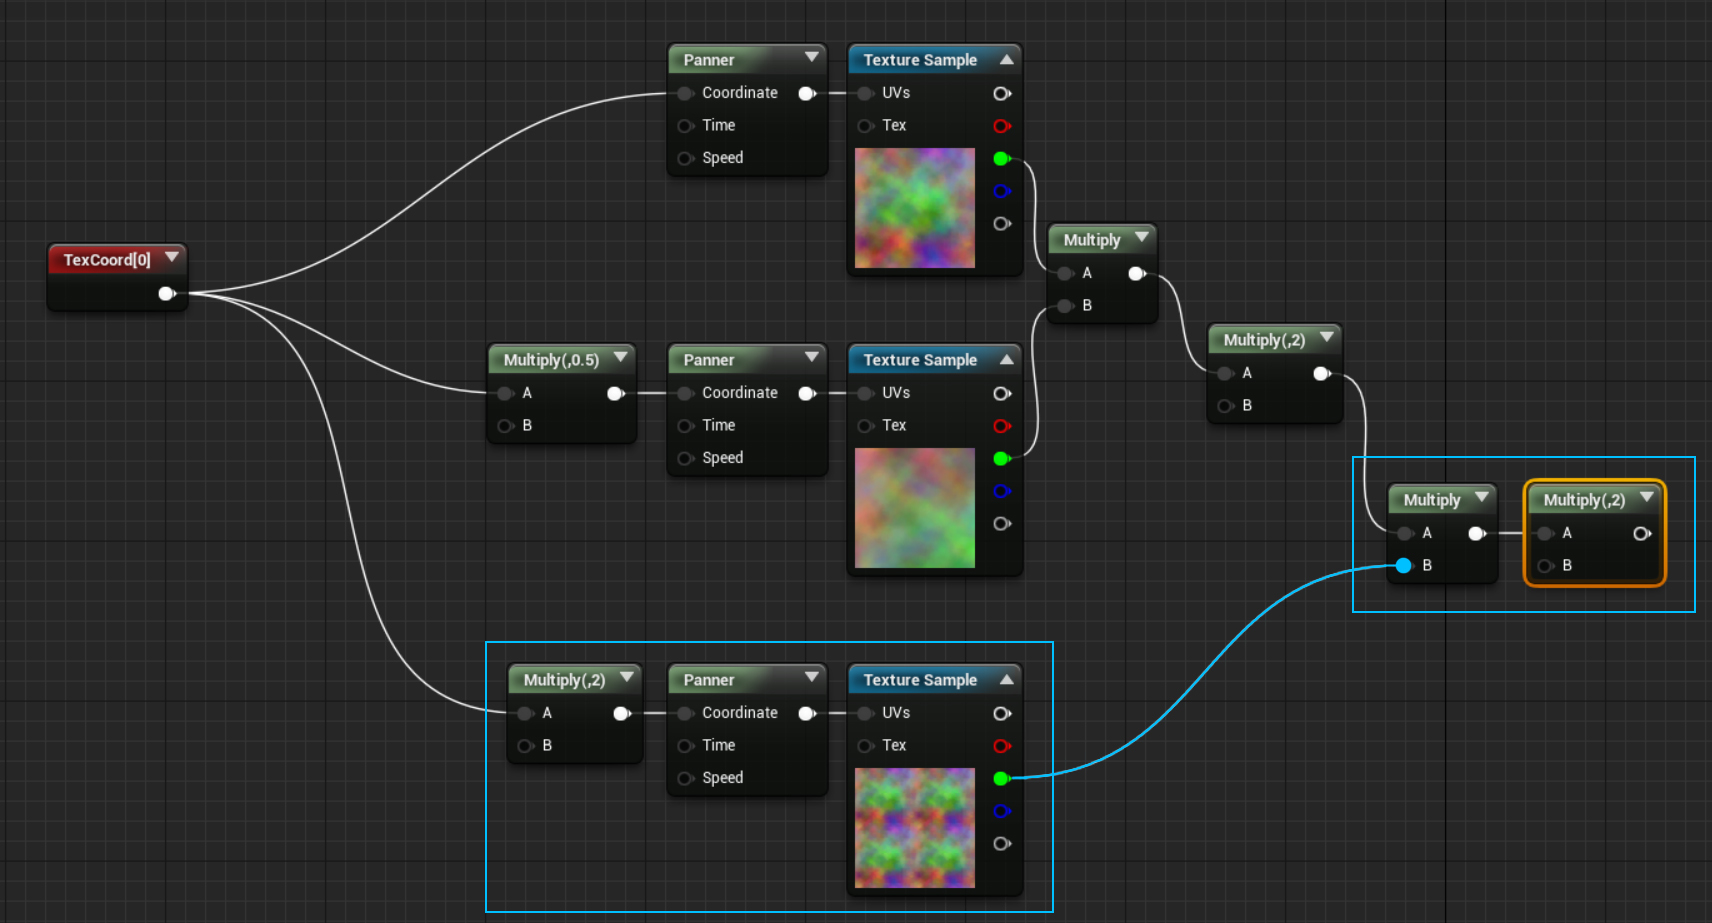
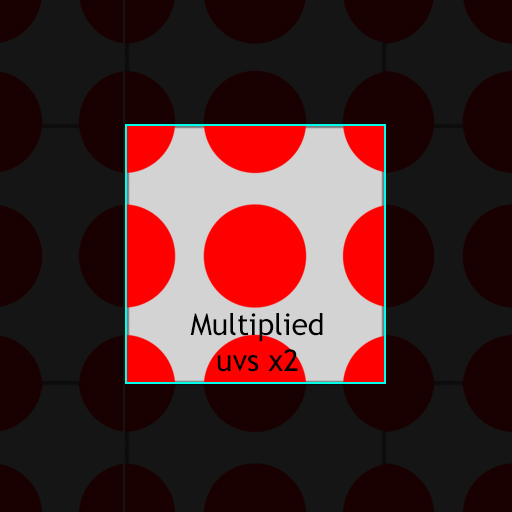
Next we need a third texture sample of the same texture, with its uvs multiplied by 2. We will then multiply this with the last images final result then multiply the outcome by 2 again.
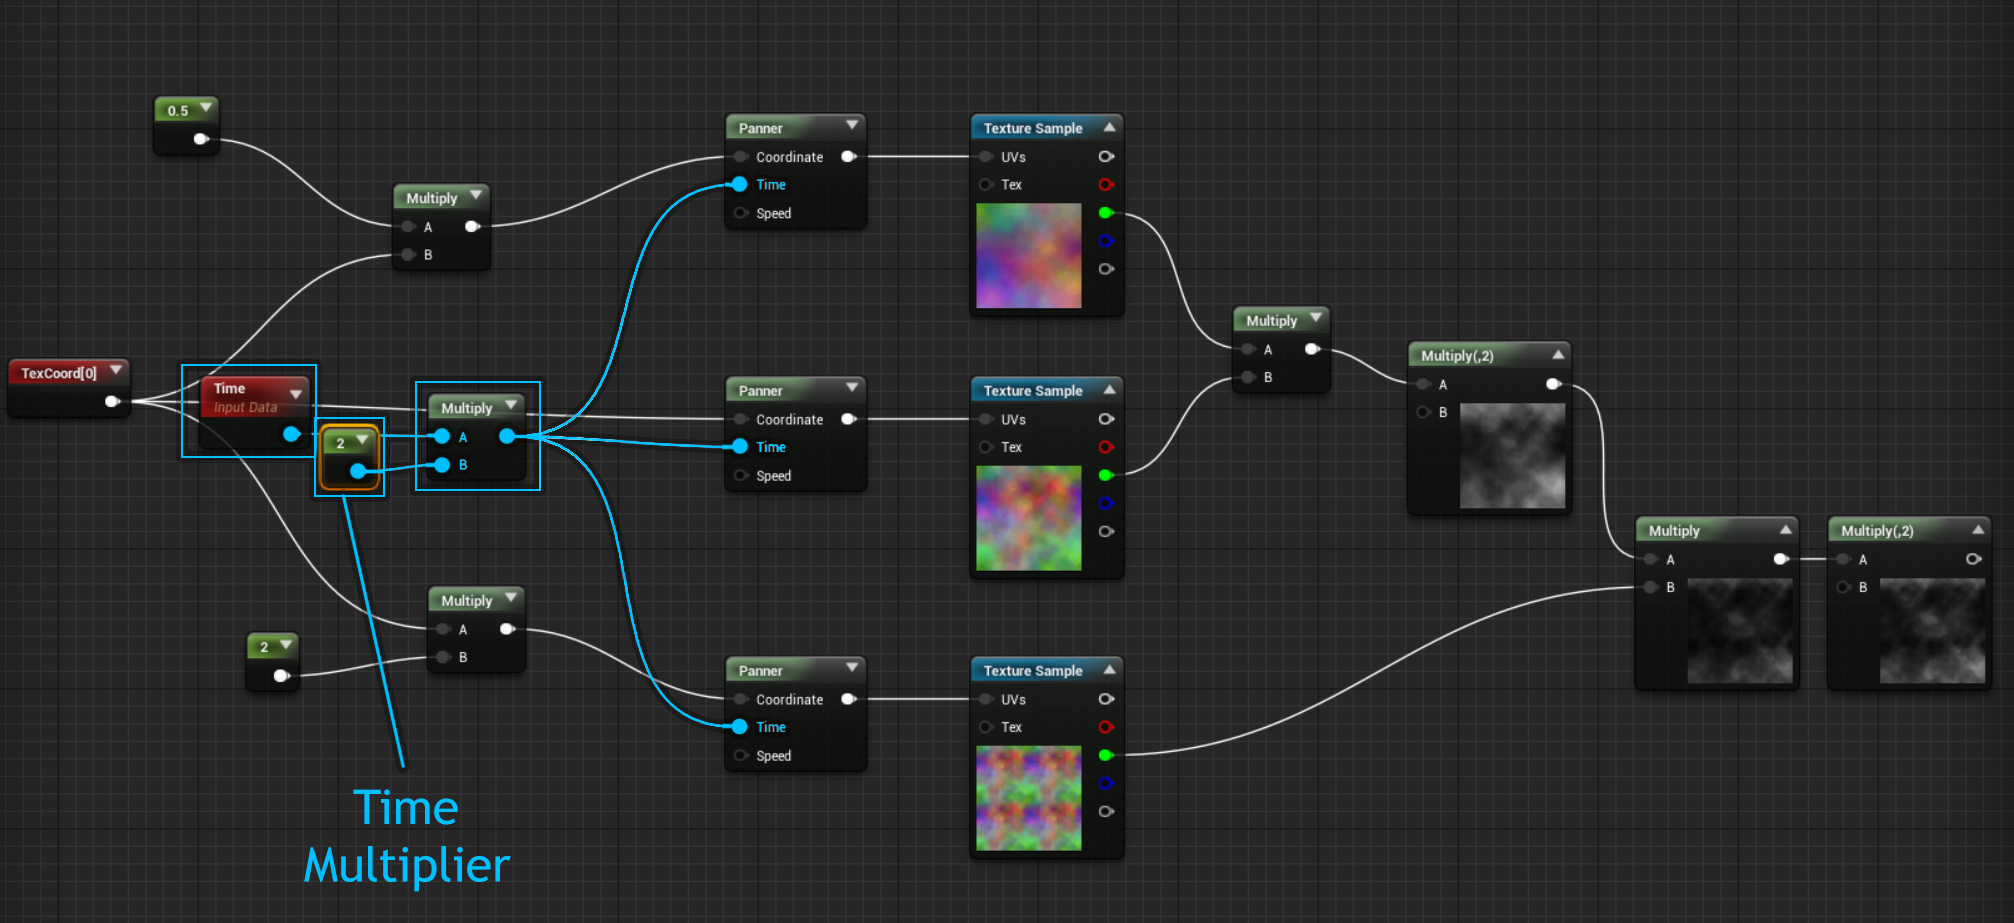
Quick tip: Create a time node and plug its output into a multiplier. Plug the output of the multiplier into the time of all your panners. This is an easy way to speed up and slow down the scroll speed of all your panners at once. (I apologize for the inconsistent texture coordinate set up in the images, they all do the same thing. I just had a few crashes in unreal and had to recreate the material a few times)
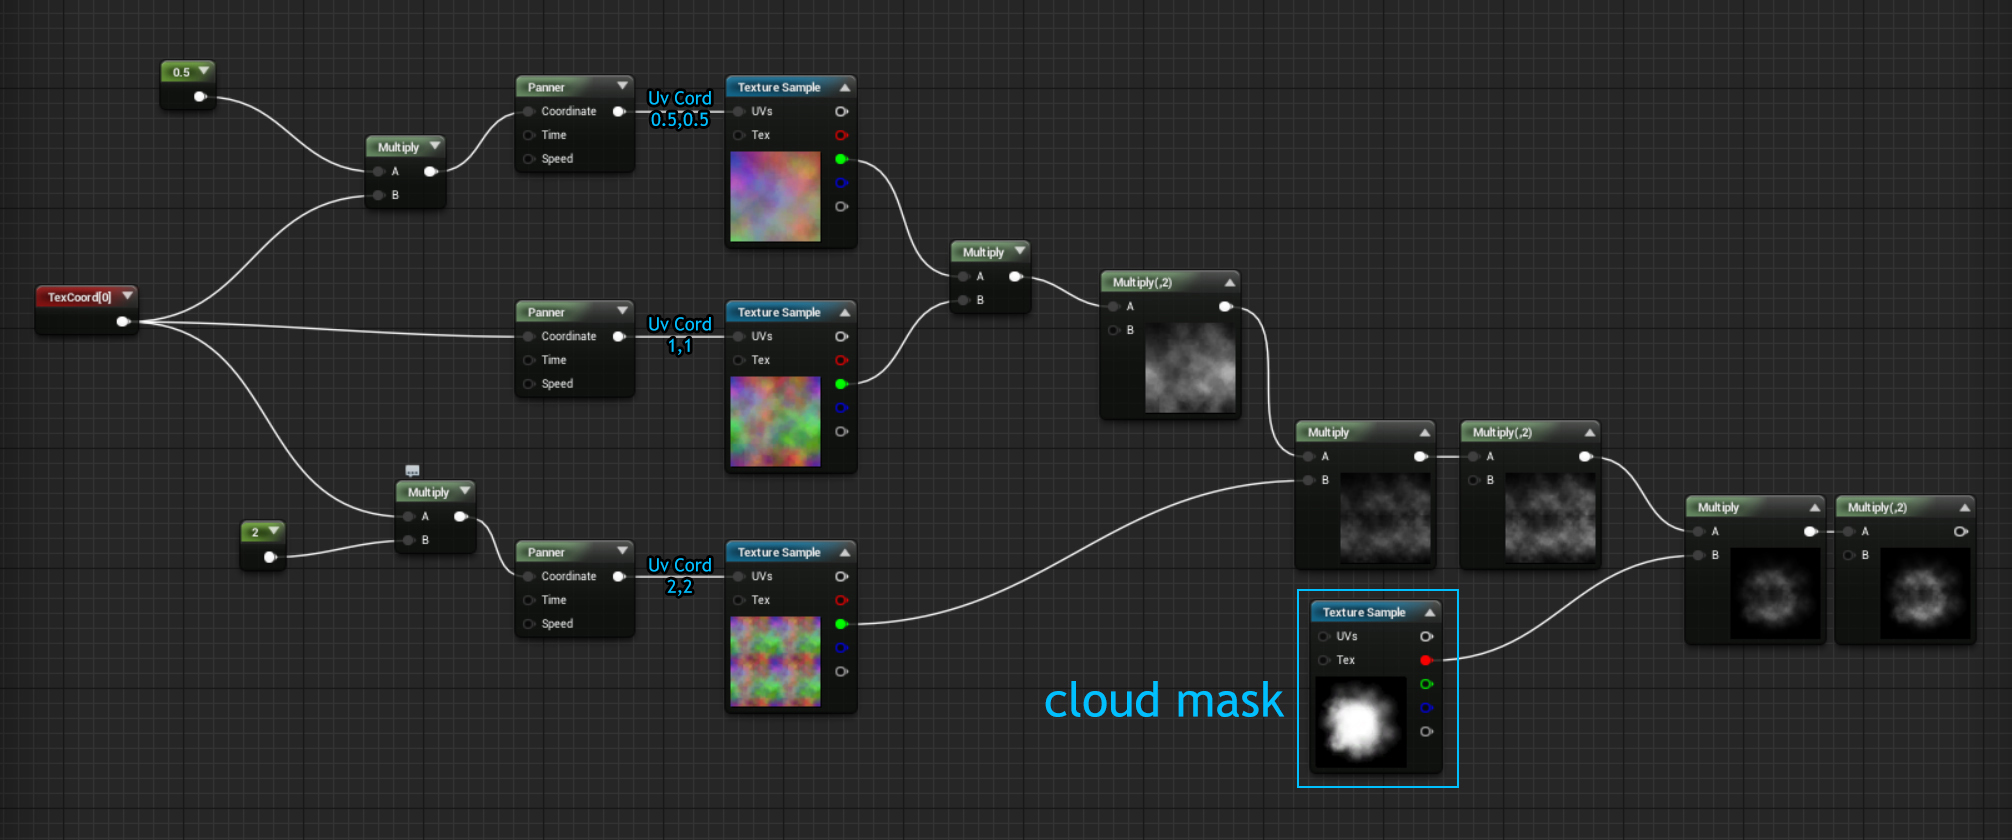
Next we need to multiply this scrolling noise texture with a mask to give the chaos some shape. For this, we will use the cloud mask I provided. All you need to do is multiply the end result of your panning clouds with the cloud mask texture sample, then multiply the end result by two.
You are now done… almost!
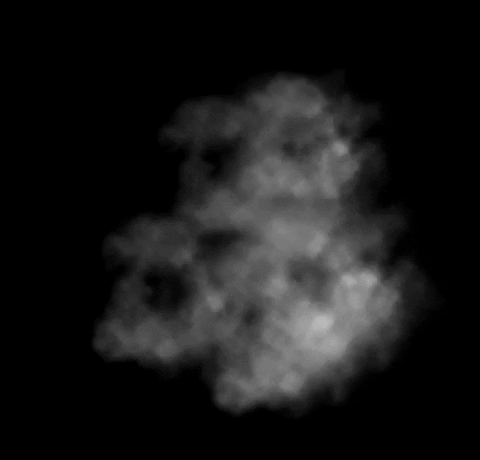
You will notice when you emit this cloud material as particles, that all the noise pans from the same point in the texture, in sync. This can give your particles a tiled look. In the next example I will explain a simple way to fix this.
I have broken the example above back down to two noise textures - panning and multiplied together for this demonstration.
We are going to be using a Dynamic Parameter node to randomly offset our noise per particle spawned at the start of their lifetime. We use dynamic parameters as a way to add or change values in our particle materials while in the particle editor. In this instance we are going to be using it to offset the texture by a number between one and zero per particle.
We will be adding a number to the uvs, as opposed to multiplying the uvs, because we want to push the uvs in a direction. Rather than scrunching them. See the example below.
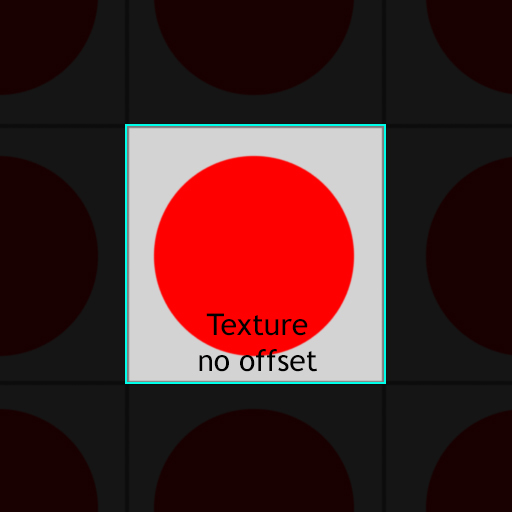
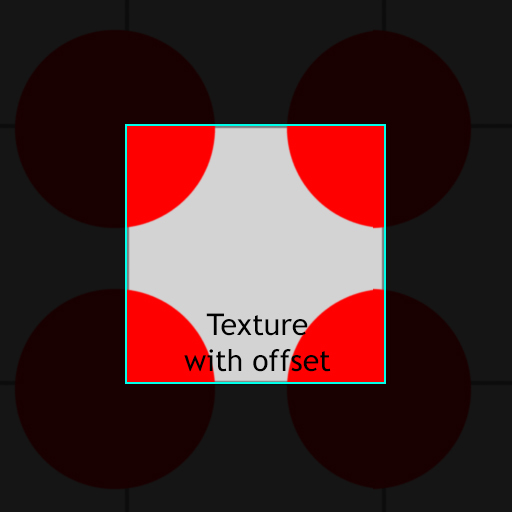
The two images above are what it looks like when you add 0.5 to the uvs of a texture coordinate plugged into a texture sample. As you see it pans it halfway along the X axis and halfway along the y. A default texture coordinate in value terms is 0-1, 0-1. Our example on the left has had 0.5 added to it. So its value would be 0.5-1.5, 0.5-1.5. Below I will post a UV coordinate when it gets multiplied
The above texture coordinate has been MULTIPLIED by two. As you see it creates a different result to the images above. The uvs have been scrunched on both the x and y axis, as opposed to being shifted. The Value of the above texture coordinate would be 0-2, 0-2. As 0-1 has been MULTIPLIED by two, as opposed to added to.
Now that is out of the way. You should understand why we are using the dynamic parameter. We can control this parameter per particle just like any uniform input we use in the particle editor, such as size and lifetime. We are essentially going to set up a number between 0 and 1 for the dynamic parameter to choose between, per particle. This will offset our noise between 0-1 for each particle. Removing the obvious tiling we had before with our noisey smoke!
Setting up the dynamic parameter in Cascade
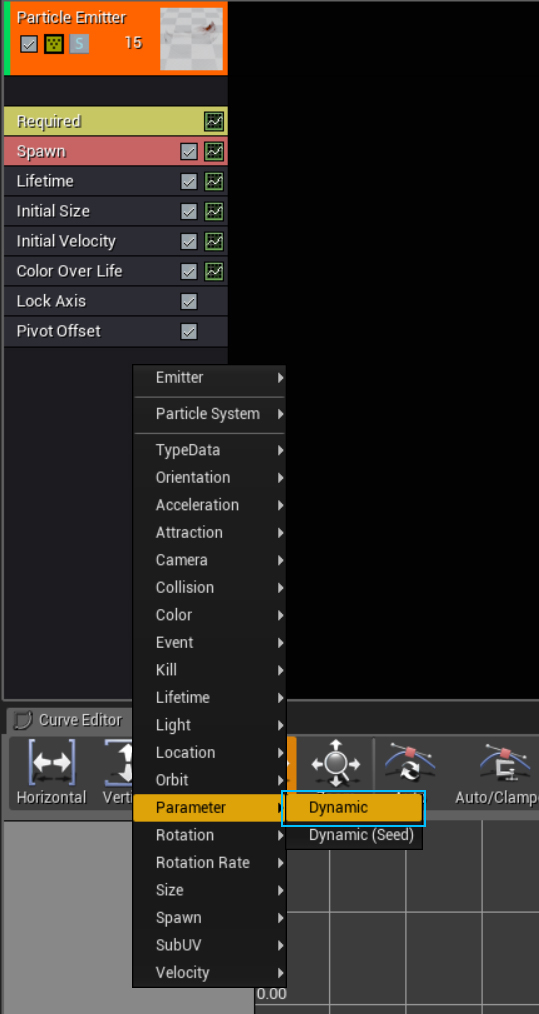
First we need to add a dynamic parameter to our particle system. To do that, right click on your particle emitter drop down. Navigate down to parameters and select Dynamic.
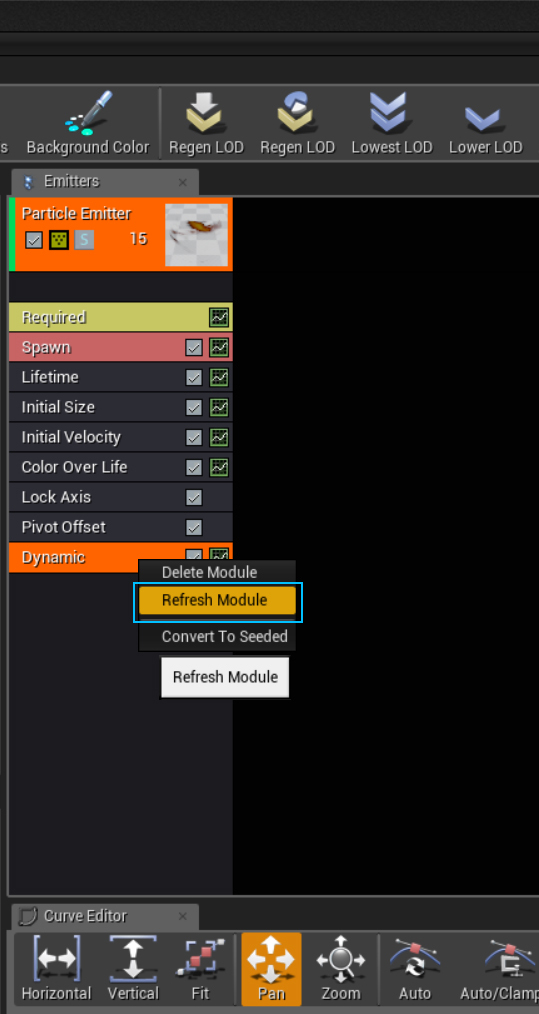
Next, right click on your newly added dynamic parameter and select refresh. This will update the dynamic parameter with the names you entered into your material dynamic parameter. In this instance, I named my red channel uv_offset
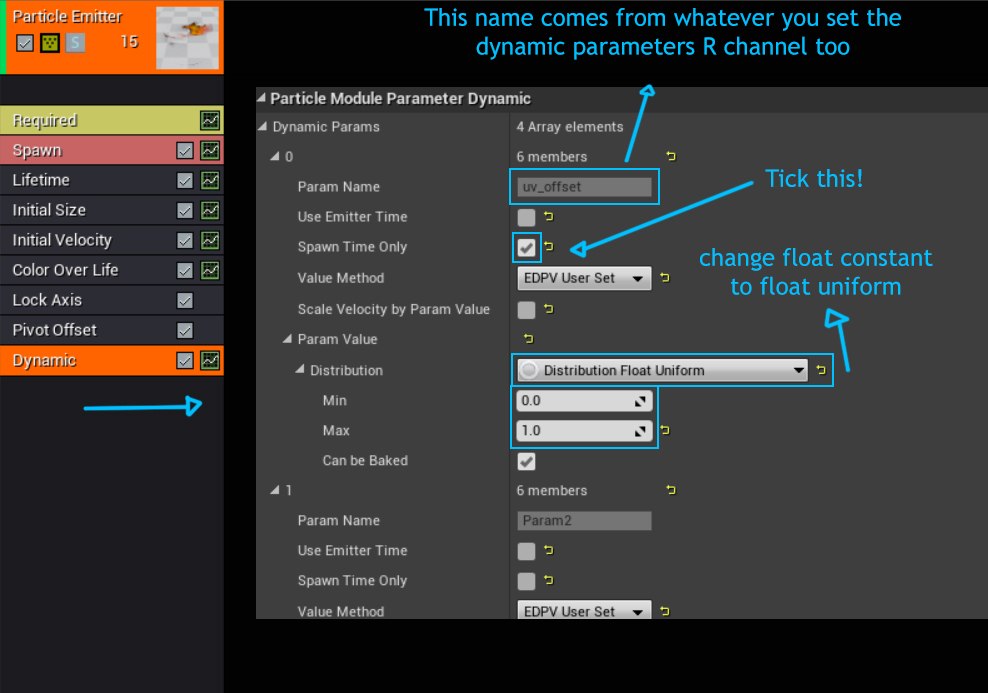
Next we need to look down to our dynamic parameters settings. Open up “0” under your dynamic parameters drop down list. “0” in the dynamic parameter is your red channel. 1,2,3 Will be your green, blue and alpha channels respectively.
Under “0” you will see whatever name you set as your dynamic parameters red channel and a bunch of other settings. Tick spawn time only. This will make it so when a particle spawns, it will pick a random value from the parameter below. Once it has that value, it will not change over the course of its lifetime. If you fail to enable this option, you will notice your particles will be flashing like a disco.
Last we need to change our Float Constant under Param Value to a Float Uniform. Once changed to a Float Uniform, set the min to 0 and the max to 1. Your particles should now be picking a different noise offset per particle! Yay, no more tiling!
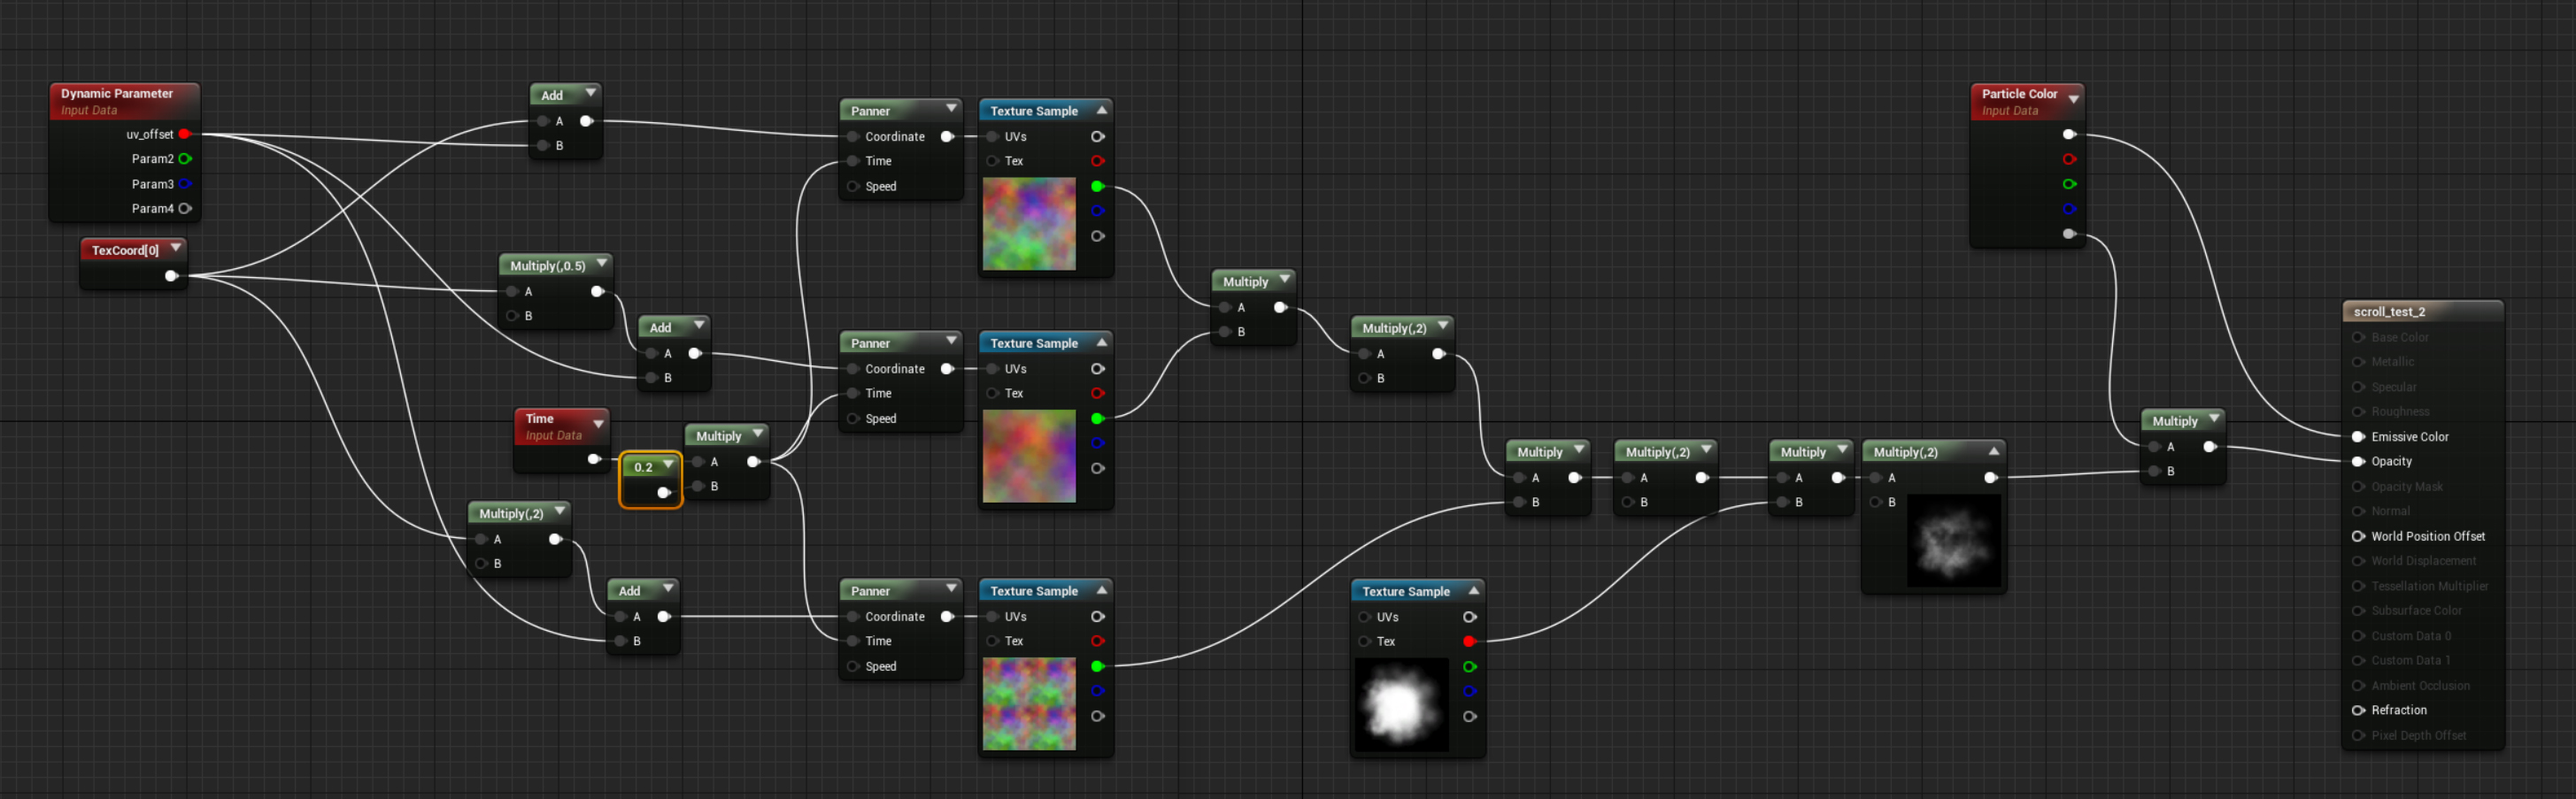
Your final material setup should look like the image above

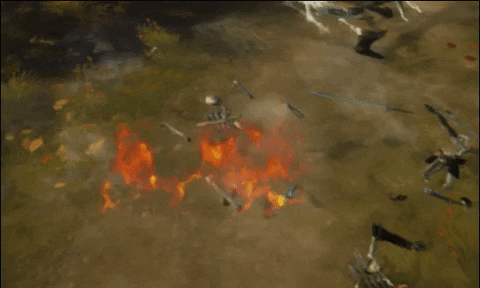
This technique isnt just for clouds. You can create all kinds of things with it!
Quick final notes
I recommend only using two texture samples for scrolling noise most of the time. Three is great for large smoke particles but can get too noisy for smaller shapes.
You do not always need two scrolling textures multiplied over the top of one another for this method. For example if you have 1 fire shaped mask and 1 tiled fire texture that you pan upwards multiplied together. This could be enough for a satisfying particle effect. I tend to just use 1, 1 and 0.5, 0.5 texture coordinates with various stretching and squashing
You can use this technique for colour too! Try multiplying two scrolling rgb texture samples together!
Try to always multiply the output of your two multiplied together textures by two. Otherwise you will end up with some very dark outputs!
Remember that certain elements tend to scroll in a certain direction. For example cold smoke would scroll and fall down, as fire scrolls and rises up!
Hope this was somewhat helpful to someone out there!
If you see anything that you think could do with some re phrasing, feel free to send me a pm
Comments