이펙트아카데미 특강/외주/커뮤니티
 Making-of: VFX 고스트리콘 브레이크 포인트
https://80.lv/articles/making-of-vfx-for-ghost-recon-breakpoint/
Introduction
Hi, my name is Lou Cortes. I am a Real-Time VFX Artist from France with two-year experience in the game industry at Ubisoft Montpellier where I worked on Ghost Recon Breakpoint and Assassin's Creed Odyssey. Since I was young, I always wanted to be part of a team that created amazing experiences. To do so, I entered the world of 3D art by joining the Game Art course at ArtFX. Today, my job is to create visual effects in order to amaze and guide the players through the game experiences.
Learning Real-Time VFX
Real-time VFX is magic, but you don't need to be a wizard to learn it. There are a lot of different tools and approaches to create a visual effect but it isn't more complex than any other job in the game industry. Being a VFX Artist requires to have a polyvalent knowledge of the game tools and fields as well as both artistic and technical skills.
A good method to start learning real-time VFX is first to understand the hierarchy of creation of a usual visual effect which is the following: Texture > Material > Mesh/Sprite > Particle System. Therefore, the needed skills to create a usual visual effect would be Texturing/Simulation > Shadering > 3D Modeling > Particle Effect. One doesn't have to be perfect in each secondary skill. That's the thing about creating VFX for games: you will need to own various secondary expertise while excelling in one or more is a great plus.
Understanding the hierarchy and learning a game particle system tool like Cascade, Niagara, etc. will be a good approach. Learn their constraints and optimization, try to master them.
In order to go further, one will need to know the animation principles (see 12 Principles of Animation), the artistic fundamentals (see Riot Style Guide) and of course, how the different matters behave (you can do that by watching a lot of videos of real-life effects and analyze them, plus Elemental Magic by Joseph Gilland explains it well, too).
Contributing to Ghost Recon Breakpoint
I had the chance to work on Project Titan's content of Ghost Recon Breakpoint (GRB) along with the team of Ubisoft Montpellier. During the production, I worked closely with Benoit Baron and Antoine Arthur who are part of the VFX team. During that time, we went through the whole process of creation of a visual effect, from its concept to the final optimization. Many of the tasks were shared between each other, we've put a lot of hard work and teamwork in it.
Something I really wished to work on was the lava effects and shaders. I feel really glad my team trusted me on this big responsibility.
I was also tasked with creating sulfuric and volcanic atmosphere visual effects, as well as various boss skills.

Tools
The tools I use are from the game engine itself: particle system, shader, and nodal scripting, plus some externals: Photoshop, 3ds Max, and Maya. I don't rely on Houdini or any other particle effect generators of that type. It is not something I needed yet to create visual effects but it is something I desire to add to my arsenal as it is a powerful tool.
Fumaroles
In order to create this type of fumarole, two main elements are needed: one emitter that will define the global shape (1) and the second emitter that will help to shape the birth of the fumarole (2).
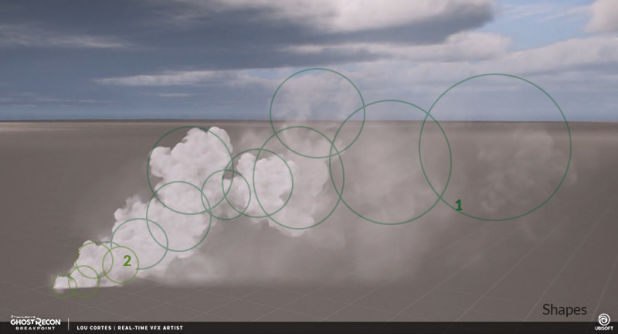
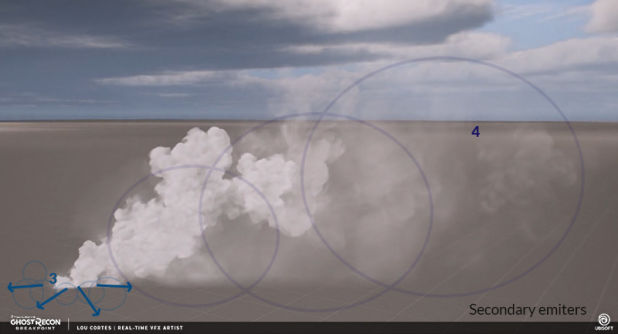
In GRB, I've added two other elements that appear only at close range in order to add more details: an emitter that will randomly emit smoke on the ground at the fumarole birth (3), and one for the opaque fumarole only which emits light steam around the global shape (4). Then, I played with some of the emitter modules such as the number of particles spawned, size, speed, and alpha. The dissolving of the steam into the air was accomplished via the texture animation and the alpha over life.

Smoke
The render of the smoke in GRB relies on the shader and textures created by Baptiste Erades. We used a specific tech called "lightmapped smoke" that allows us to nicely fake the light and shadows depending on the sun direction, giving this nice optimized volumetric smoke effect for the particles. It is a great plus for Ghost Recon's franchise as it improved the quality of the visual effects.
Lava Surface Effects
The deformation on the surface of a lava puddle was conceived through the shader with vertex noise and UV distortion directly on the mesh. In order to fulfill the boiling effect, I've added lava bubble particles on its surface. This effect was created with spherical mesh particles that would grow and then disappear leaving sprite particles to take the relay on the popping of the bubble.
The lava geyser contains both mesh and sprite particles as well. The first ones were used to help the integration of the sprites particles, which alone would create rectangular shapes at the intersection of the puddle's mesh. Only one animated texture was used for this effect, it was mixed with the second type of fluid texture in order to add more randomness in the shapes.
Like for most of the other lava particle effects, no animated textures were needed for the lava splashes of the bullet impacts. By playing with the alpha multiply while the texture is opaque and has a smooth gradient on its alpha channel, one can easily create an effect of animated fluid texture while playing with the particle's size. Although this technique can't be used for all the fluid purposes, it is a great option to create nice and optimized fluid effects.
Lightning Effects
In GRB we would only have sprite textures for the lightnings which works very fine for most of the cases except for the Gargoyle skills (one of the first raid's boss) that would have the players surrounded by lightnings.

In order to solve this problem and upgrade some of the lightning visual effects in the game, I started searching for a solution using mesh particles that would fit the engine's constraints. The first thing that I had to do was referencing in order to understand how the lightnings would behave. Once done, I would note down all the main elements that define a lightning effect and sketch down how to reproduce them with a mesh-shader technique that could be overridden in the particle system. Finally, two different meshes were created in order to add variety in shapes, and a shader that would have vertex animation, UV distortion, and a lightning life system. After its integration in a particle system, a tweak on its timing and the addition of light would finalize the visual effect.
Timing
A good way to approach the timing of a visual effect is to understand how the different matters of your effect behave individually and get influenced by the forces that define your effect. This will help you grant realism and credibility. You can do this by analyzing a lot of real-life effect videos. However, as we are making visual effects for games, it doesn't have to be totally copy-pasted from real life. That's where you can play with the 12 principles of animation, for example, using anticipation and exaggeration in order to give more impact to an explosion.
Lou Cortes, Real-Time VFX Artist at Ubisoft Montpellier
Interview conducted by Kirill Tokarev
Comments