이펙트아카데미 특강/외주/커뮤니티
 유니티 - 포탈이펙트 예제와 제작과정
All 7 Sketches:

or all combined in video form:
VFXRealtime Sketch #22 Black&White: Portal sketches
Finished Portal:
Description:
Portals can be formed by funneling energy into singularities: black specks in space consisting of highly condensed energy. Fueling them will cause them to become unstable until they ultimately collapse in on itself. This collapse releases tons of energy, enough to tear a wormhole in the fabric of space.
Main effect:
Opening effect:
Video containing the entire effect & shows layers used to build up the effect
VFXRealtime Sketch #22 Black&White: Portal Final
Hey hey!
Here I’ll be posting the effects I’m making for this month’s challenge. I will be going in depth in every effect I make, but if there’s anything that’s still unclear I’d love to hear from you! Of course, any kind of feedback is always welcome
I’ve decided to make… Circular portals!
My main focus won’t be to make different types of portals. Instead, I want to try and make every portal with a different technical and/or stylistic approach. For that reason my sketches have began and evolved mostly in Unity as I was building them, trying out different inputs and textures. I’ll try to give a little bit of insight in my steps in my breakdowns.
The 5 (and a half) effects I currently have:

-Breakdown and WIPs of all sketches-
Portal 1
Full effect:
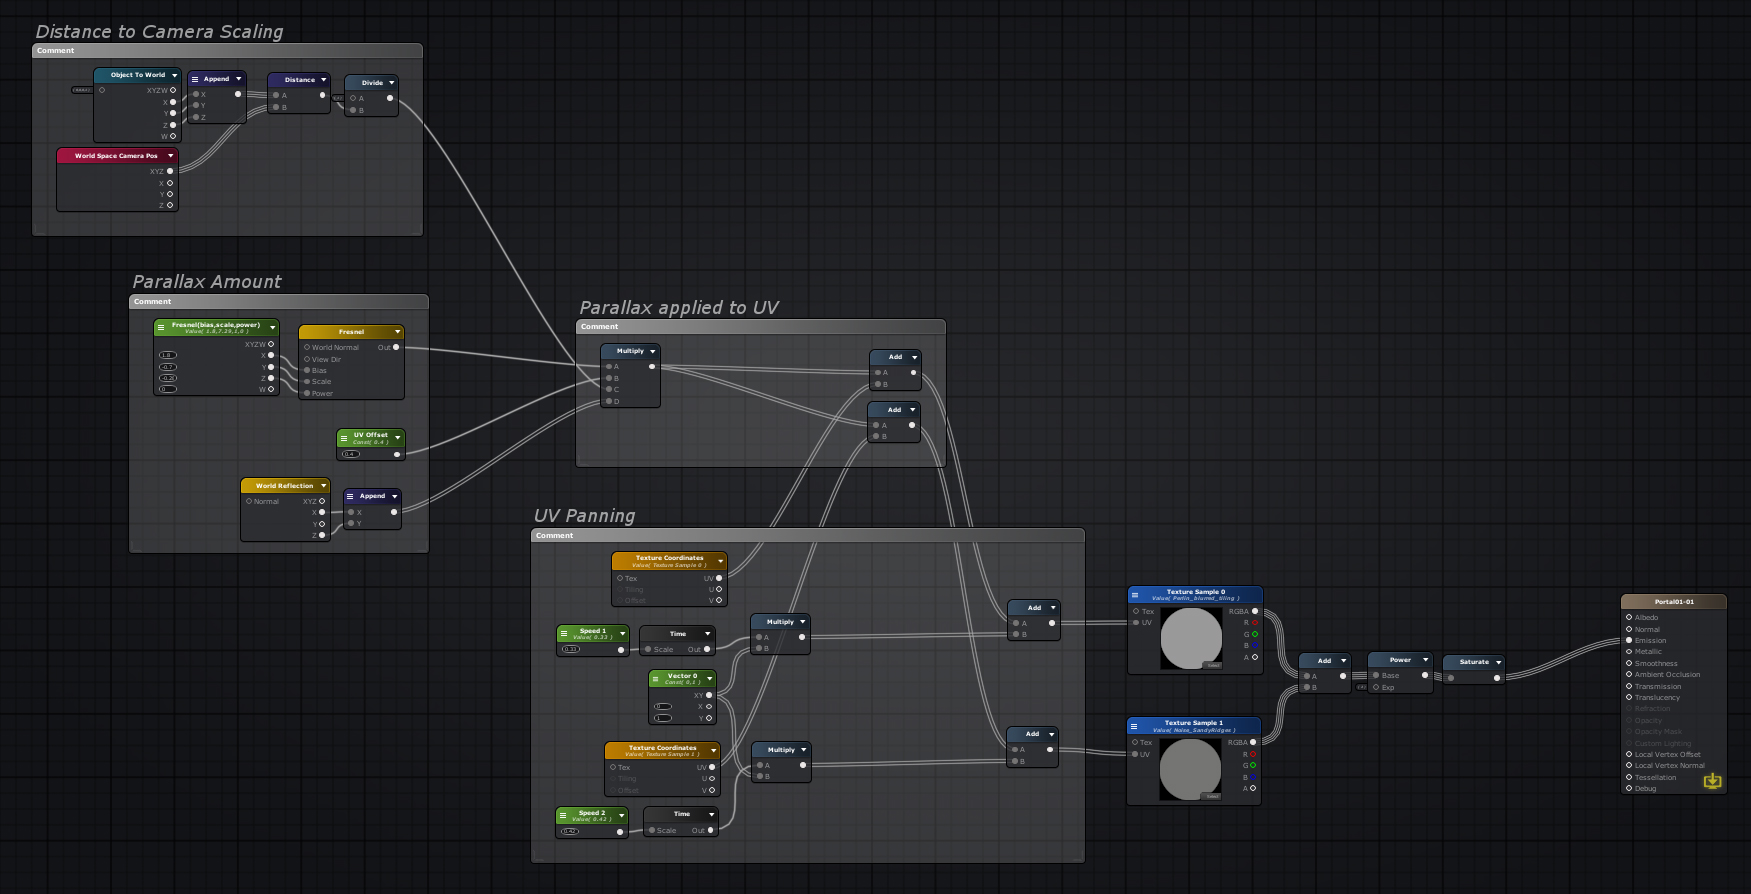
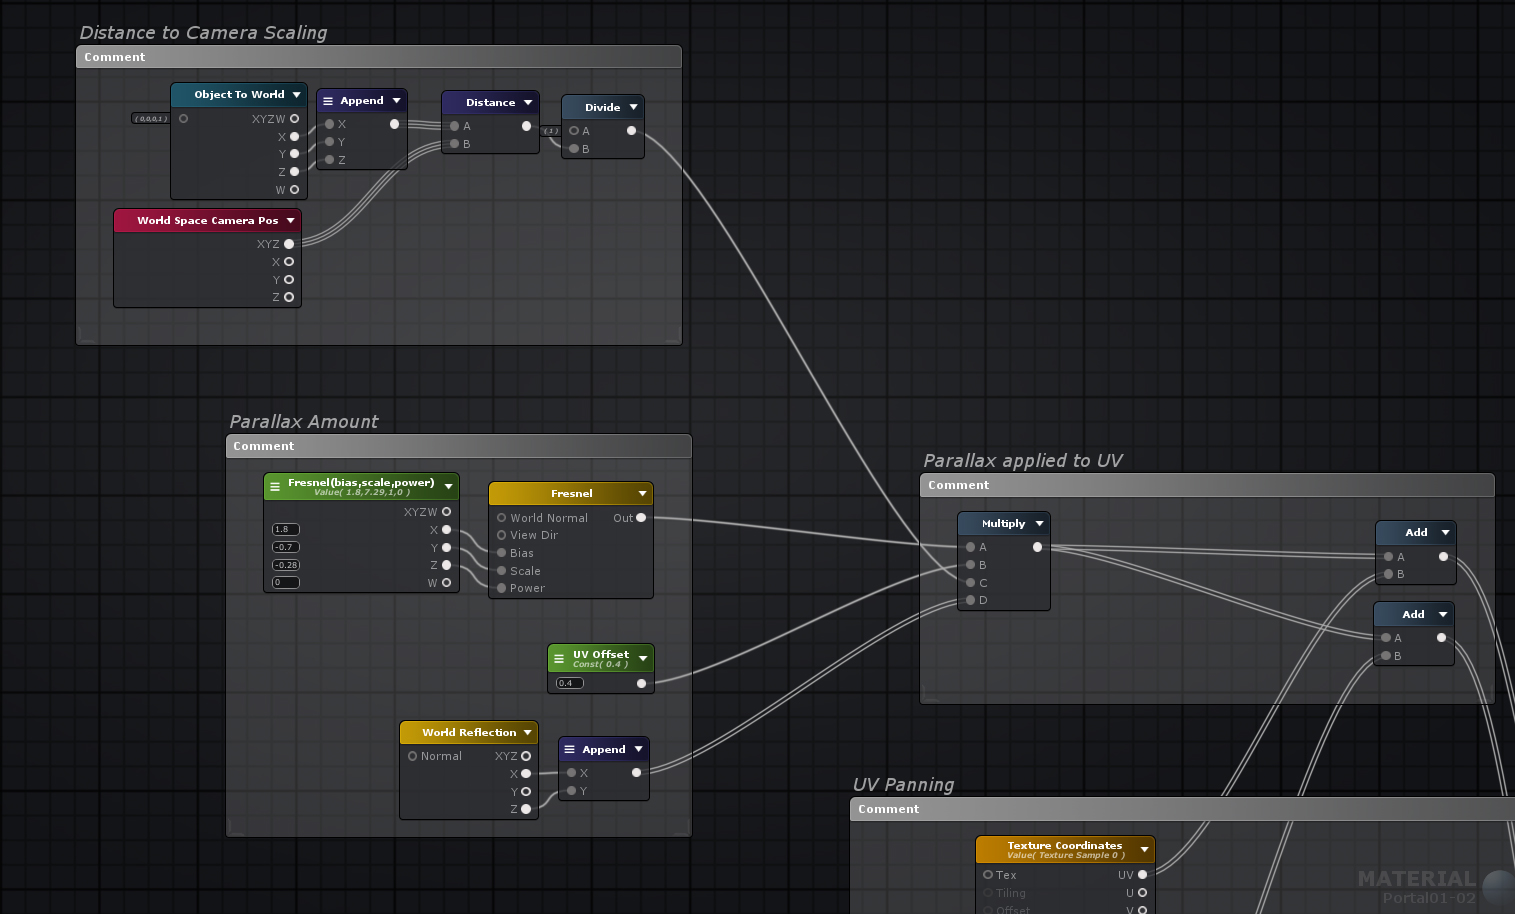
My first idea was to create a portal with a parallax-like effect. A sort of ‘peek to the other side’ to show that it’s more like a ‘hole in space’ than a disc in front of you.
Using a fresnel multiplied by the reflection-vector, I achieved a parallax effect. This is not the traditional ‘exact’ way to achieve parallax, but I liked the warping effect it produced. Using a dome-like mesh amplified the warping effect in the parallax thanks to the fresnel used to calculate it.
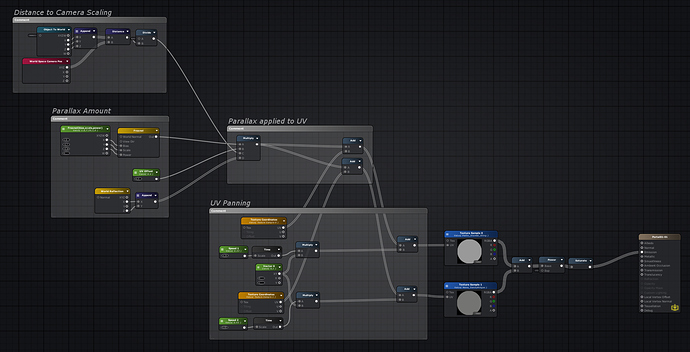
Portal01_Nodes01.jpg1751×894 466 KB

Portal01_Nodes02.jpg1515×914 370 KB
It also allowed me to play with the fresnel values. Making the power go below 0, a whole new effect emerged: the texture pinched in the middle of the portal, when looking straight on. This was amplified by setting the fresnel scale to negative values as well.
I used the reflection-vectors for X&Z, as I was working with a horizontal portal at first. I decided to rotate the portal to be vertical, creating a tunnel-like effect, as long as the mesh faces either in the X or Z direction.
The distance of the camera is added to the UV calculations, so it scales along with that, as seen here as well.
To give the portal a stronger border, I put a simple quad with glowy texture behind the portal. Simple speck particles flowing in a vortex add to the tunnel feeling.
Portal 2
Full effect:
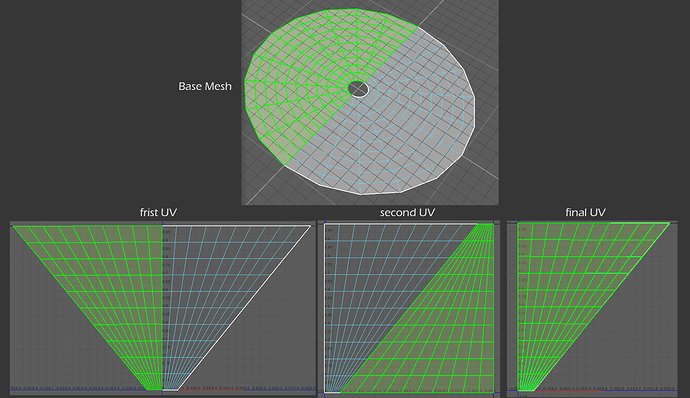
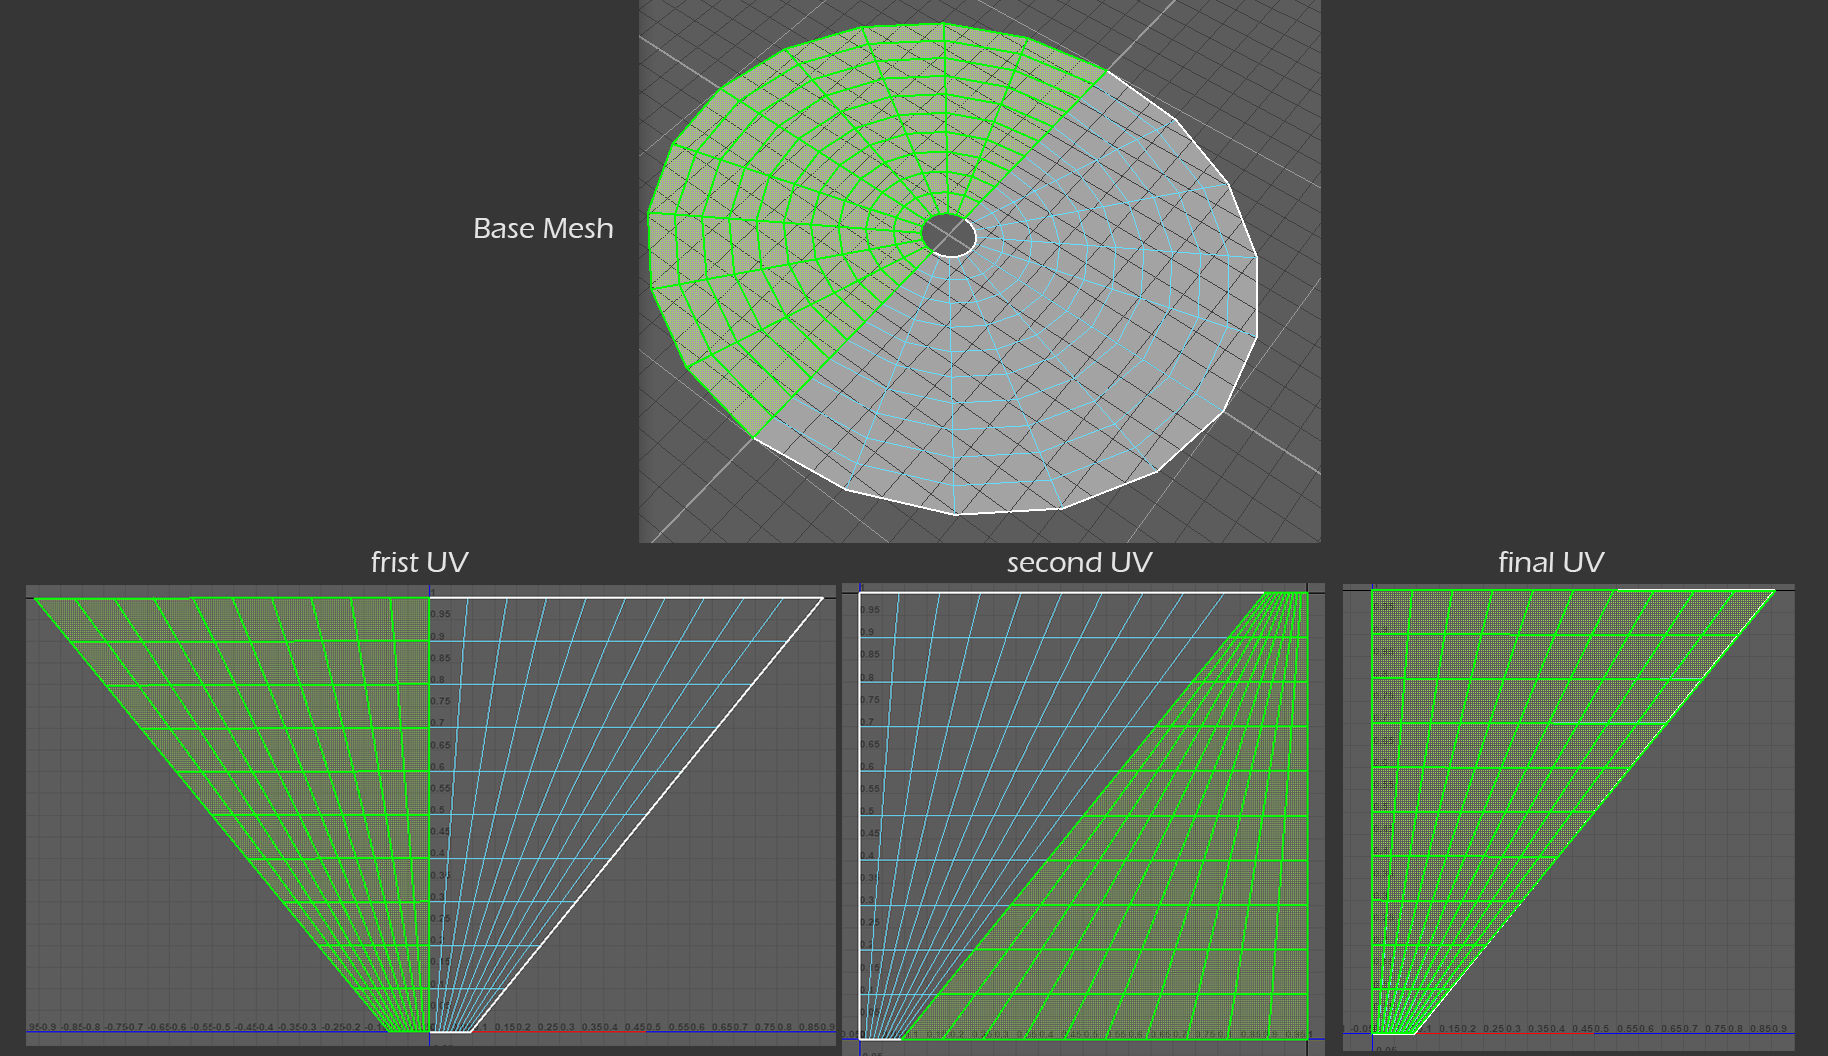
For this portal I wanted it to look like it was bending space itself. So, for this version I went with folding and warping the UV’s on a disc.
At first, I simply warped the UV to look like this, so the textures would scale from the edge to the center. However, this caused an ugly edge across the portal.
(see first UV)
Just testing out how it would look, I flipped half of the UVmap, so it would fill the square. The edge still remained, but it gave a nice vortex-like effect.
(see second UV)
To remove the seam, I decided to overlay the ‘flipped’ half onto the other half, so now the texture would be mirrored across the mesh. This was fine and gave the warping effect I was looking for.
(see final UV)
UV’s:
Portal02_UV.jpg1828×1056 1.27 MB
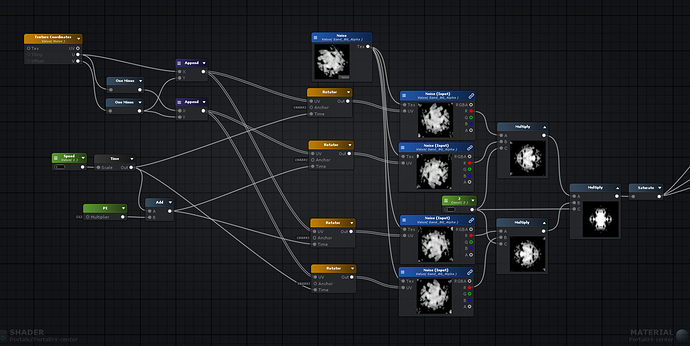
Now panning the texture from top to bottom was the most intuitive approach, which looked alright, but the motion was too predictable.
So instead I went with the rotational feeling it had, and rotate two textures instead with different pivots. This made it feel more like a vortex already.
To make the effect more ‘warpy’ and unpredictable, I made the pivots move around in circles too.
I wanted to go for a noise texture at first, but after trying several textures, these speck-textures are the perfect fit, giving it an almost Interstellar-black hole feeling.
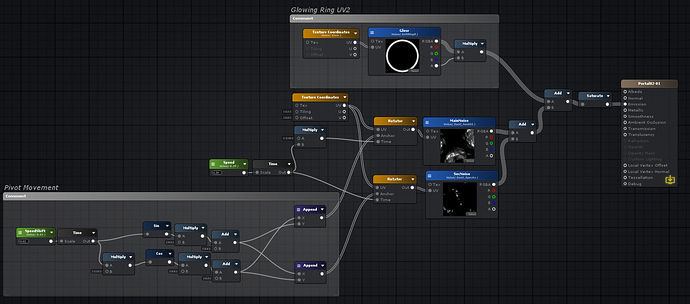
Portal02_Nodes01.jpg1862×821 454 KB
To make the look change based on viewing direction, I wrote a little script to rotate the mesh based on viewing direction, so the mirror-seam would face the direction of the camera.
And to finish it up, I added a glowy-texture to the edge with a second UV map, and some stretching particles across the edge.
Portal 03
Full effect:
I wanted this portal to feel more like a violent vacuum, an unstable void. Quite violently it stirs up dust and wind, and a black fog emits from it.
I started with the void: A simple black circle, its edge distorted by a noise texture. The circle is generated using UV values, and with that I generate a thin white line along the edge to give the portal a harder border. Subtract it with the noise map to make it unpredictable and wavering.
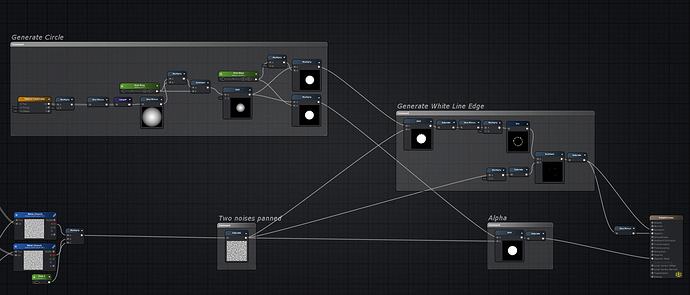
Portal03_nodes01.jpg1862×797 458 KB
Particles play a more important role in this effect. Theres 3 main parts to it:
- White dust falling around the edge, behind the portal.
- White dust being stirred up and thrust forward.
- Black fog flowing from the void
They all use a simple shader, using an alpha blended texture being distorted by a noise texture. The main differences are:
- These particles live longer and are affected by gravity. Like the dust can settle down behind the portal.
- Particles are thrust forward in a slight vortex motion, sucked into the middle. Sprites rotate like the air is rolling inwards.
- Flows out heavy and close to the ground. UVs are heavily distorted so it feels less natural and more magical.
Portal 04
Full effect:
This one is based on a concept I made a while back and still wanted to incorporate into something new. A sort of kaleidoscope effect. It’s not really cheap, but is relatively easy: The mesh is rendered X times, but only 1/Xth part is visible.
This is done by making a second UVmap, which is just a planar projection. Make the alpha clip using a ‘pie-slice’ texture (or generate it with ATan2, like I do here).
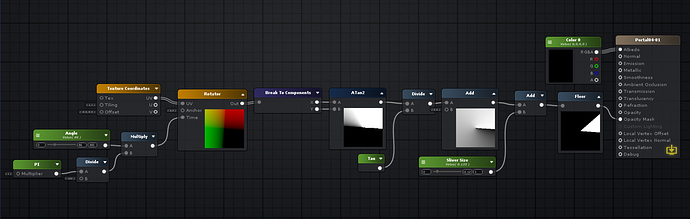
Portal04_nodes01.jpg1634×519 251 KB
The pie slice is rotated by a value ‘Angle’ 0-360, which is controlled by script.
This is important, because the mesh must be rotated at the same speed in the opposite direction. The mesh is now seemingly static and warping.
Now duplicate the mesh X times, matching the pie-slice size, and mirror every second mesh, so every edge lines up with the other.
This version has two layers rotating at different speeds, one with 8 meshes and the other with 16. One of those layers has a plane in between to add a glowing effect inside of kaleidoscope.
In the middle of it all is a simple quad with another kaleidoscope-like effect in shader.
The middle quad achieves its kaleidoscope effect fully in a shader, without having to duplicate meshes:
Portal04_nodes02.jpg1892×950 540 KB
Portal 5
Full effect:
For this one I wanted to use some broad ribbons to create a vortex / singularity effect. Everything gets sucked into this tiny condensed spot in space.
This uses a really simple shader, panning 2 textures across a tapering, curved ribbon.
The alpha is both textures multiplied * 2. The edges are faded by using UV values, which allows for finer control. Finally a power can be added to the alpha for hardness.
To get the colors I lerp two colors over a vertical gradient, subtracted by the alpha to get some nicer color transitions.
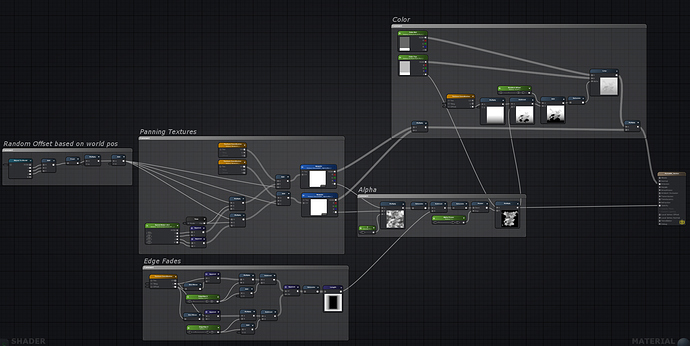
Portal05_nodes01.jpg1892×950 594 KB
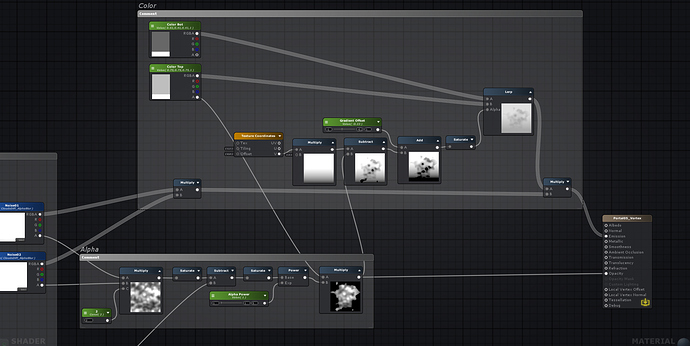
Portal05_nodes02.jpg1892×950 487 KB

Portal05_nodes03.jpg1743×690 288 KB
All other elements use a distorting shader, either alpha blended or additive, using a single panning noise texture to distort the UVs. There are three elements added:
- a single white dot in the center, where everything is sucked into. I made sure to make this the highest white value of the entire portal to stand out more.
- A ring surrounding most of the portal. I feel like the effect works without these rings as well, but adding them confines the singularity. This makes the effect feel more like a portal: Adding borders makes it so you have a clear line to enter and exit the portal.
- A black blurry blob behind the vortex, to make the white center and streaks stand out more. This is three quads rotating at different speeds.
Portal 6
Full effect:
This effect was inspired by a painting I encountered by Andrew Hem:
Andrew Hem

5,177 Likes, 133 Comments - Andrew Hem (@andrewhem) on Instagram: “May 14th @jonathanlevinegallery. #mountainfull.”
So the concept was to have a waterfall in skewed perspective, looking inside of it. At first I was thinking of doing it with parallax again, but because I wanted mist to rise out of the waterfall (and portal), I decided to give stencil buffers a shot. I had never worked with this before, so it seemed like a great opportunity to learn! It was quite a bit of a puzzle to figure out all the rendering orders. It consists of mainly three layers:
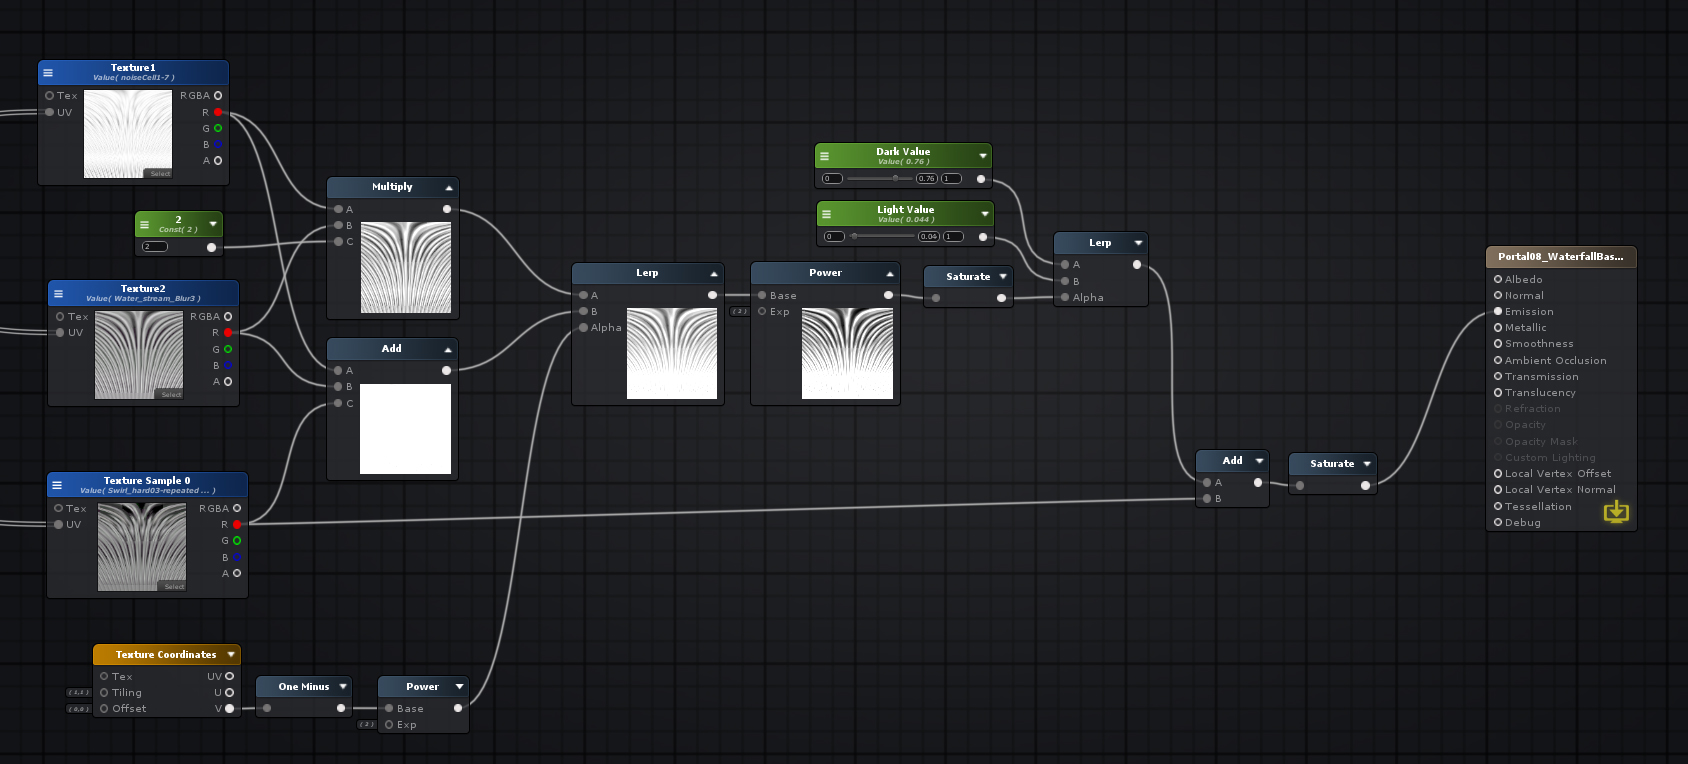
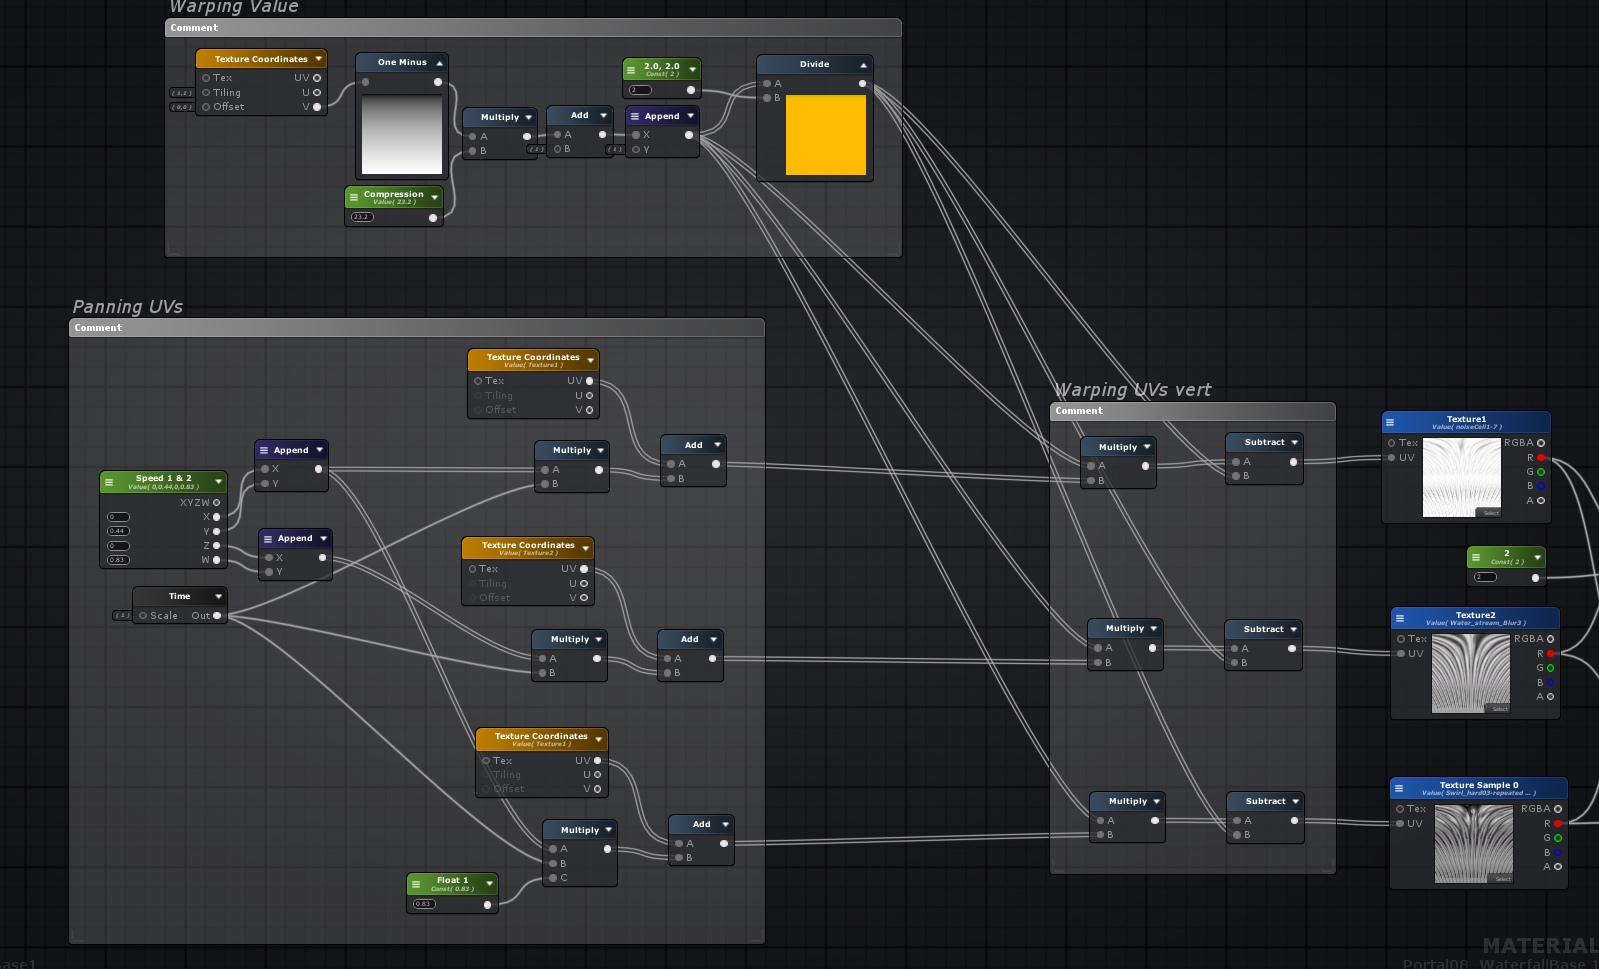
So, to start with the effect, I made half a cylinder look like an ethereal waterfall.
To do this I pan three textures across the mesh. I both add and multiply these with each other, and lerp between both results with a gradient: This way the top of the waterfall is darker. One of the three textures gets added to the total result at the end, adding an extra layer of white specks to the waterfall.
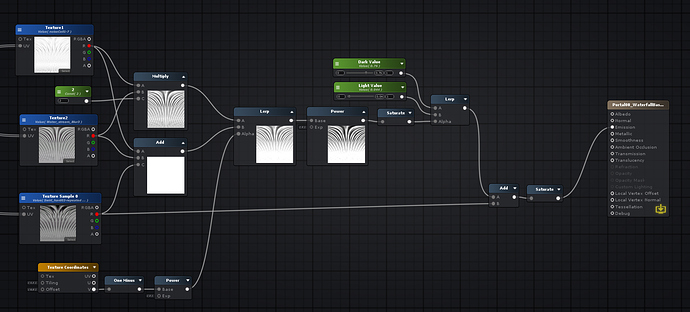
Portal06_nodes-waterfallvalues.jpg1688×764 382 KB
The most interesting part are the UVs for this shader. The U channel gets warped, so the texture appears wider at the top. I did this to simulate a sort of ‘falling over the edge’ effect; the top of the waterfall.
Portal06_nodes-waterfallUV.jpg1599×969 489 KB
I added the same smoke particles as I used in portal 3 at the bottom, slowly rising and rotating.
I used a disk-shaped mesh to stencil both the waterfall and particles. But I wanted the particles to exit the portal as they rose up. I tried different approaches, but the easiest solution seemed to be to use another stencil: I placed a second emitter in the center of the portal, emitting forward. In front of the portal I placed a big cube to use as a stencil for these particles, so when looking from the side at the portal, no particles would stick out the back.
Another layer was to add a rippling effect around the edge, as if waves were flowing in. This is a slanted edge with mesh panning. I made the ripples appear over the length as if they are fading in by using a gradient.
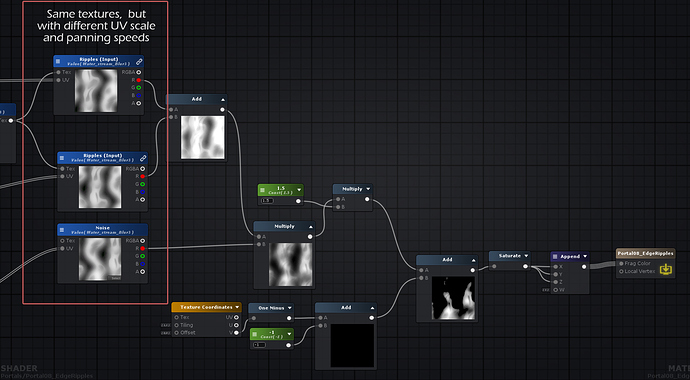
Portal06_nodes-waterfallRipple.jpg1759×970 464 KB
Finally there had to be a nice sharp edge around the portal area, glowing. To add some more flair, I added two panning noises to change values in this glow as well, mimicking the waterfall.
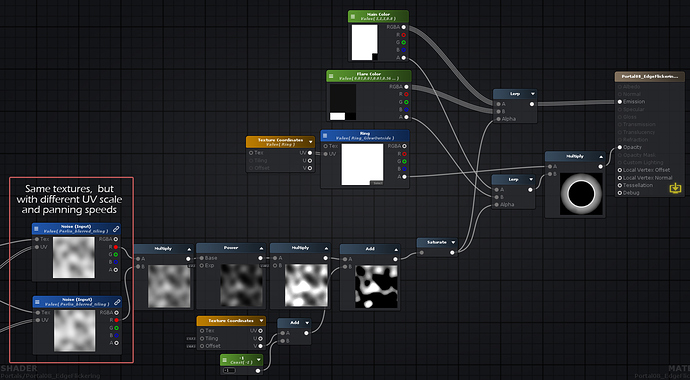
Portal06_nodes-waterfallRing.jpg1759×970 501 KB
Portal 7
Full effect:
Ok so this effect is basically two unsuccessful effects I scrapped and combined to make this portal. Here are the two scrapped effects:
First one was inspired by the Annihilation shimmer effect, which is a soapy/oily looking membrane. Ofcourse, I had to do this without color, so I focused on the movements mostly. I made the inside invert and refract everything behind it, much like the shimmer distorting reality in Annihilation. While I was satisfied with the membrane effect, it felt lacking, and I wasn’t sure how to frame it. I tried some sort of chrome-growth, but reflections and shape didn’t really do it for me, so I decided to let it rest.
annihilation_shimmer.gif540×540 2.7 MB
The second one was kind of inspired by the final scene in Annihilation as well, seeing the spikes on the blood-drops (without spoiling anything to those who havent seen the movie yet, if so, please do!)
Basically I do heavy vertex offset on a tessellated sphere, multiplied by noise and fresnel.
On top of that I added some fresnel based sine-waves to as shockwaves and a sort of breathing effect. But I couldn’t really get it to look like a portal, instead it looked more like something hostile, an anomaly of some sorts.
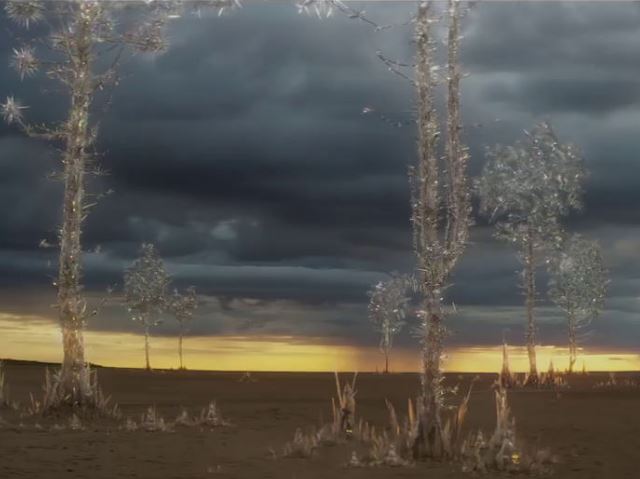
So I thought of combining these two. I kept the membrane pretty much intact as I made it in the first one, but I transformed the second one into a frame for the portal. Again taking inspiration from Annihilation for this one, I looked at the crystal trees on the beach. Spiked, see through/refractive, and breathing.
Firstly the membrane:

Portal07_nodes-membrane-main.jpg1863×644 386 KB
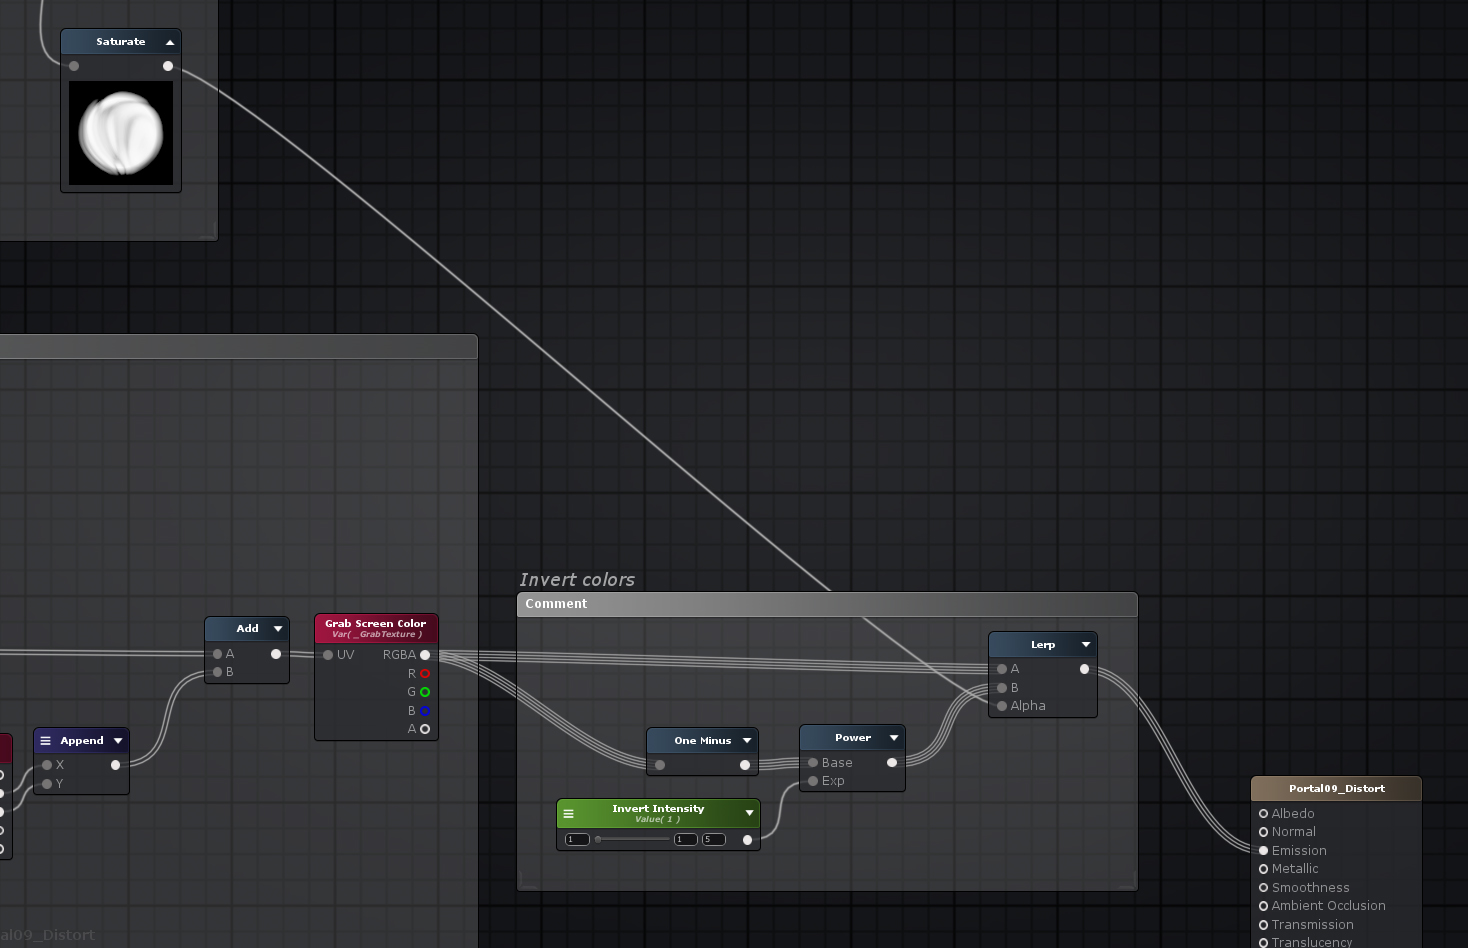
So the membrane does two things: It refracts, and it inverts the color of what’s behind it.
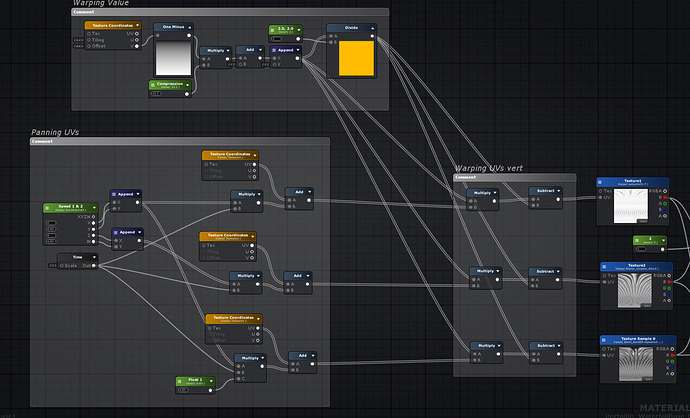
In both of these elements a warped, panning noise texture comes into play, which is the more interesting part of this shader.
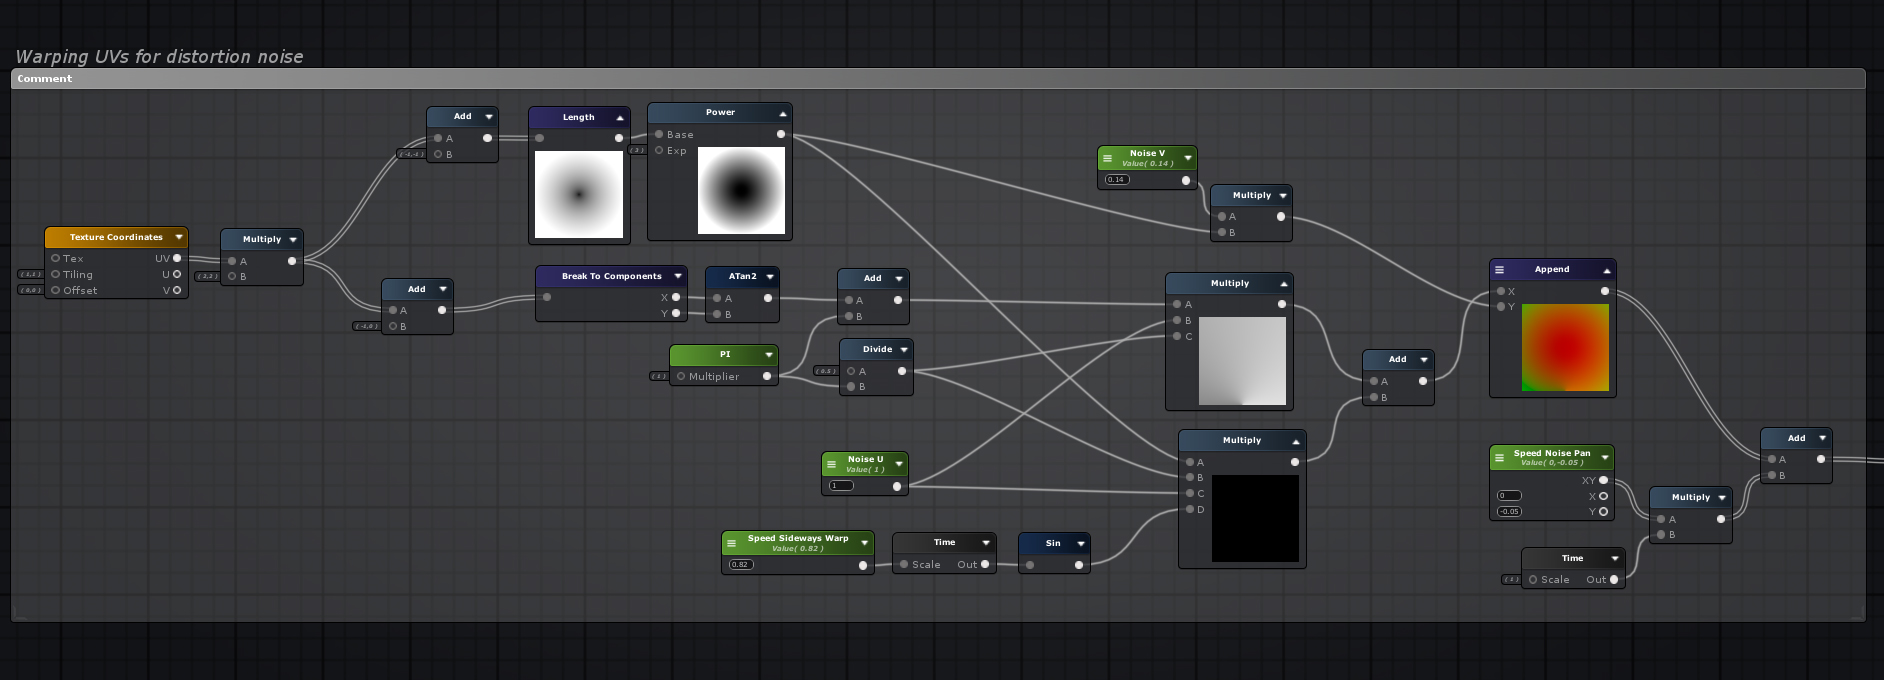
I want the texture to stretch more in the middle and compress on the edges. The panning should be nonlinear and feel kind of flowy. For this I use a slight variation on regular radial UV’s:
The V channel is a curved radial gradient. This achieves the stretching and compressing at the edges.
A bit more happens in the U channel. The base is an aTan2 function, to wrap the texture around. I don’t want the texture to come from the center, so I made the ‘pivot’ of the arc to be at the bottom.
To make the texture flow a bit more, I add a radial gradient multiplied by a sine function over time to the U channel. This makes the texture twist from left to right slowly, giving it the flowing feeling and randomness it needed.

Portal07_nodes-membrane-UV.jpg1884×680 331 KB
The noise is used to mask the inverted colors, as if the membrane is thinner there.
It’s also used to modify the screen UV’s, to refract. I also add in a ring-texture here to make the border refract even more.

Portal07_nodes-membrane-invert.jpg1468×948 320 KB
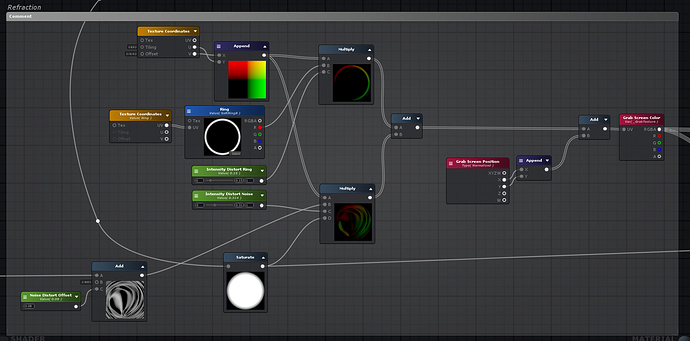
Portal07_nodes-membrane-refract.jpg1876×929 445 KB
The spiked crystal edge:

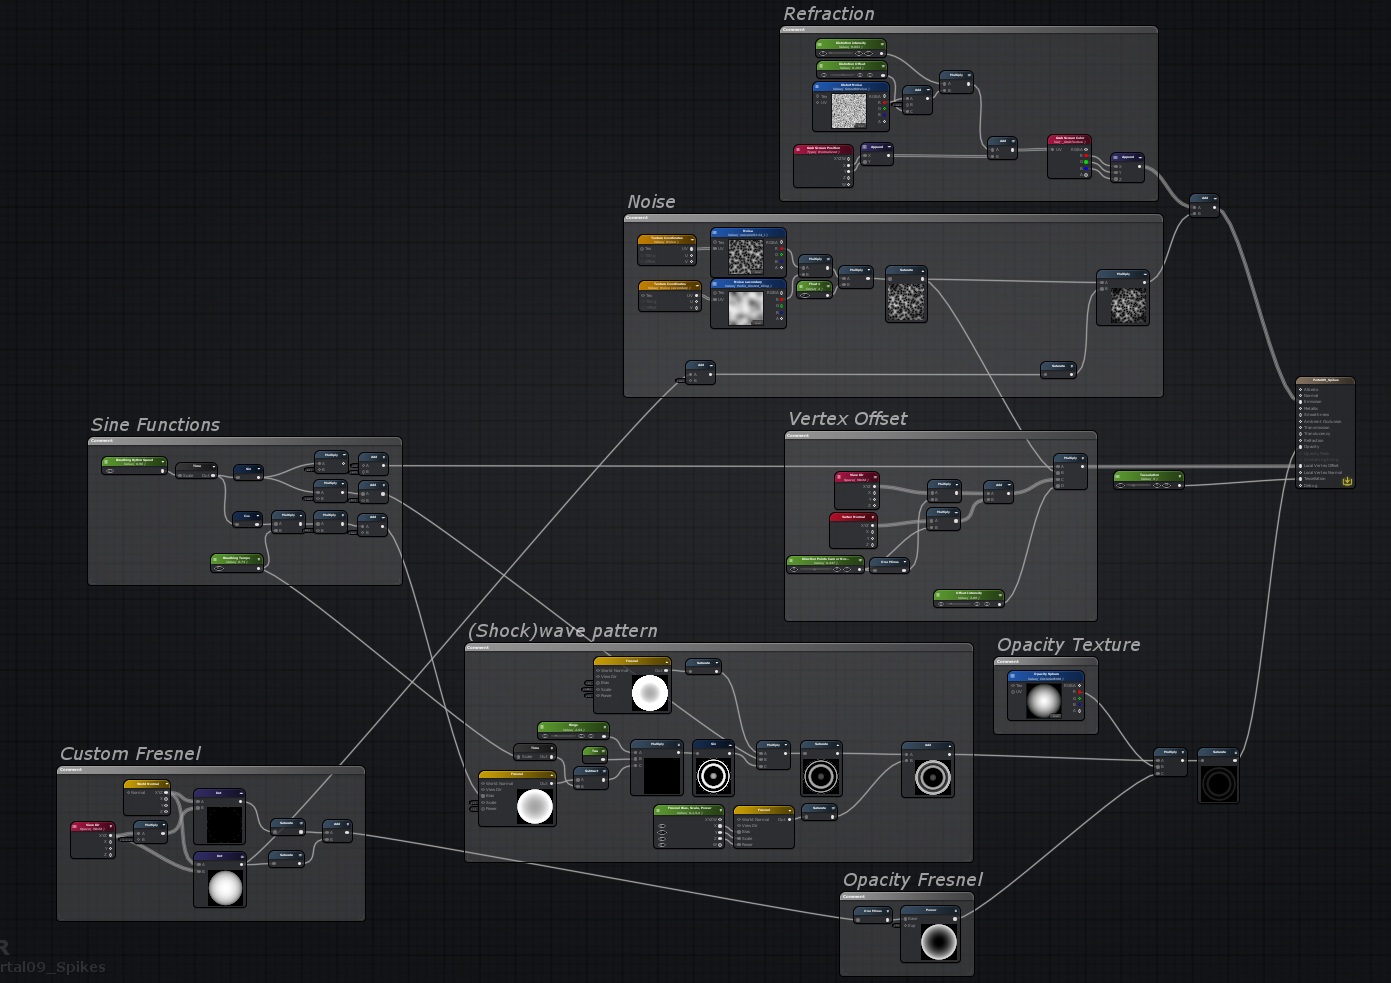
Portal07_nodes-crystals-main.jpg1391×983 459 KB
There are different elements to this shader.
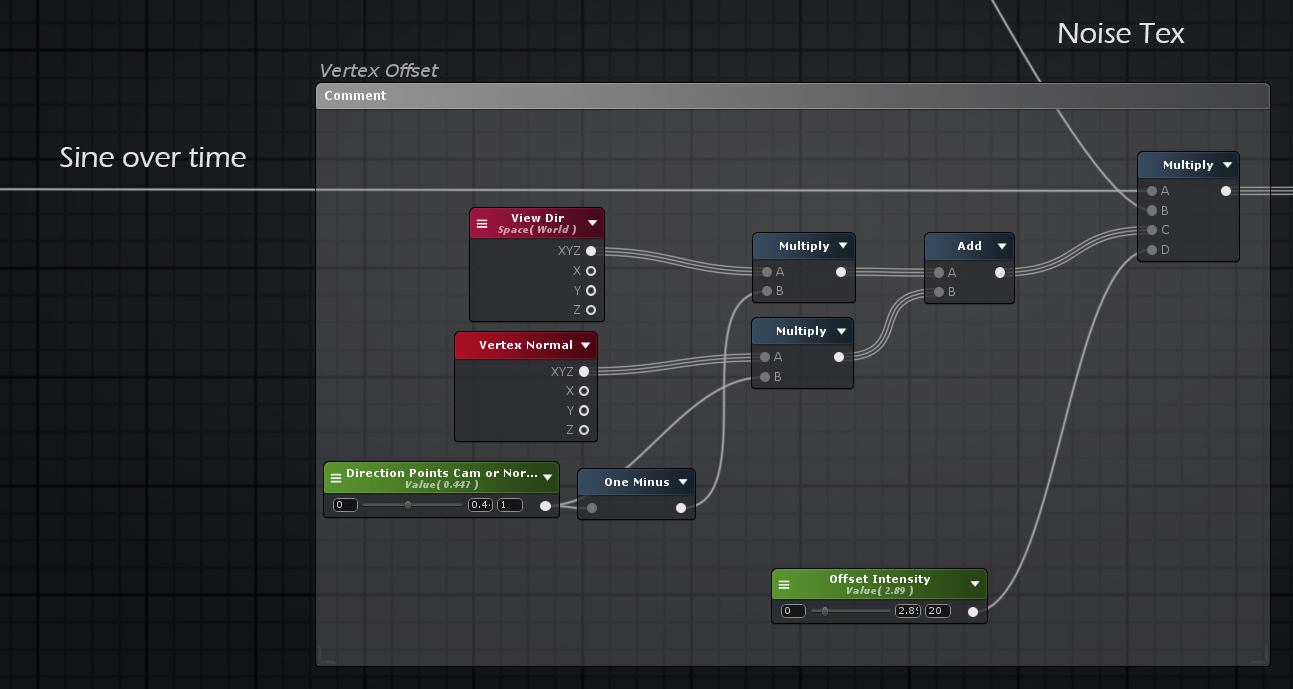
First off, the vertex offset. Most of this is a high contrast noise texture, causing spikes to form. (The same noise is also added to emission, so the spikes seem to glow). The direction of the spikes is multiplied by the vertex normal + view direction. Normally this would cause the spikes to be pointing in a tunnel towards the camera. But rotating the object allows for interesting compositions.
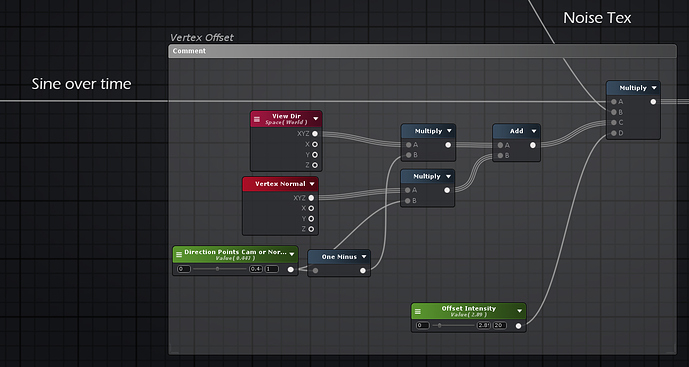
Portal07_nodes-crystals-Vertex.jpg1293×689 242 KB
Refraction is nothing more than a static smooth value noise texture.
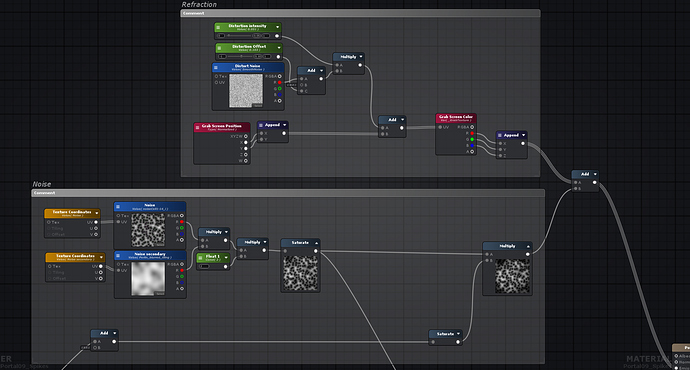
Portal07_nodes-crystals-refractandnoise.jpg1805×968 471 KB
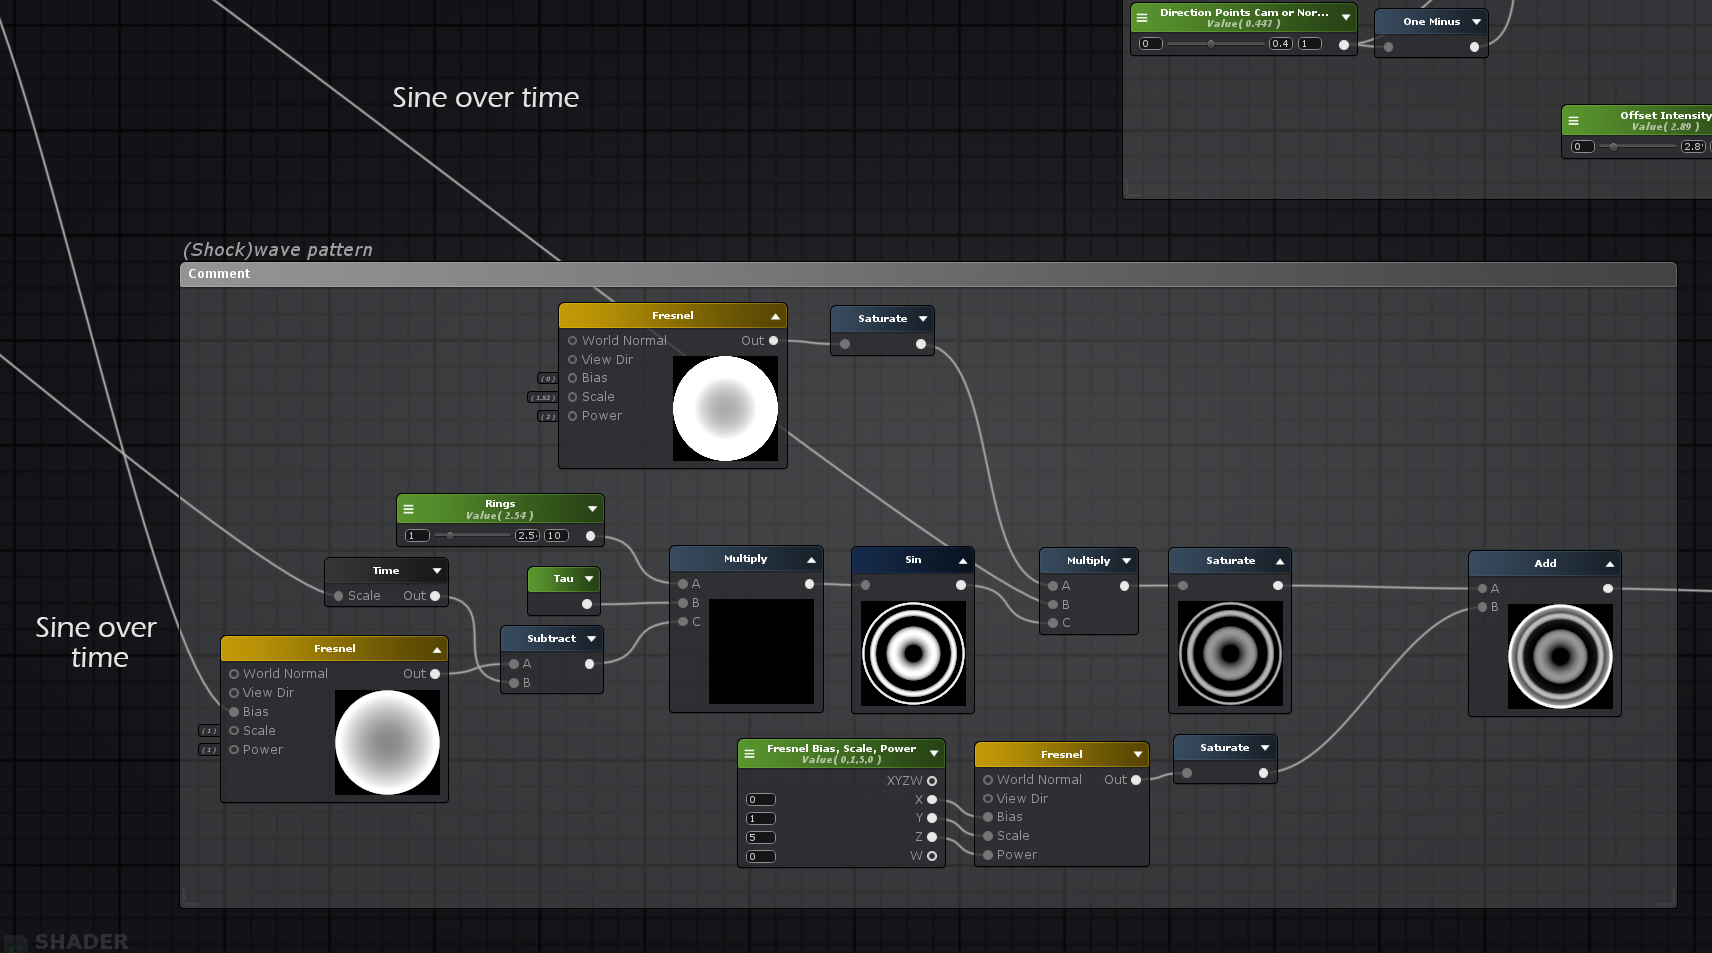
The shockwave pattern is a fresnel + time going into a sine function. I use another sine over time function in the bias of this fresnel to change up the tempo of the shockwave, making it appear to breathe.

Portal07_nodes-crystals-shock.jpg1712×953 433 KB
I use a front and back fresnel as well for the overall opacity, making the center parts invisible. This helps get rid of artifacts (the heavy spiking vertex offsets can cause you to see a bunch of backfaces). I used a texture to make sure the front is always invisible, so it doesn’t look like the crystals are blocking the entrance.
Finally I added some starry particles, floating around the portal.
Comments